Eyeglasses Editing Exercise

WELCOME TO ONSHAPE!

This exercise shows new CAD users how to edit and customize an eyeglasses frame using a public (read-only) Onshape document.

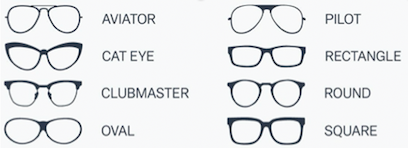
Follow the instructions on the next pages to make your own copy of the document and customize the shape of the glasses to your favorite style!

Most of the pages of this tutorial contain a video to illustrate the steps and help you succeed.

Eyeglasses Editing Exercise

CREATE AN ACCOUNT

The free education version of Onshape is a collaborative platform for student engineering project and class work.

Onshape is entirely online - there's nothing to install.

Click the New Tab icon New Tab in the top-right corner to open this tutorial in a new tab in your browser - this will make it easier to follow along as you work.

If you don't already have one, create an Onshape account here.

Once you're signed in to Onshape, return to this guide and continue to the next page.

Eyeglasses Editing Exercise

COPY THIS DOCUMENT

To work with the eyeglasses models, you need to make your own copy of the public, read-only document.

Steps

  1. Click the Onshape logo at the top-left hand corner of the window. This will return you to your Onshape dashboard.
  2. To the left, click on the Public filters to view all public documents.
  3. Search for the document name "Onshape: Eyeglasses editing exercise" in the top advanced search bar.
  4. Right-click the Onshape: Eyeglasses Frame Editing document, and choose Copy workspace...
  5. Optional: Change the name of your document.
  6. The copy will be automatically placed into your own Onshape account, and the workspace will open.
  7. Click the arrow at the bottom right of this page to continue.

Eyeglasses Editing Exercise

Prepare to Edit the Frame

With Onshape, it's possible to edit the sketch that was used to define the shape of the eyeglass frame front. The left eye is a mirror of the right, so by editing the right eye, both sides will update.

Steps

  1. Start by left-clicking once on the Top plane in the Graphics Area to highlight it.
  2. To make it easier to work with the sketch, right-click in the white space next to the glasses and choose View normal to to reorient the top plane so that it is normal to the window.
  3. Now you can clearly see the frame shape and think about how you'd like to change it.
  4. You might get some ideas from these popular frame types:
Eyeglass Frame Types

Eyeglasses Editing Exercise

Edit the Frame

Now we can edit the sketch that was used to define the shape of the eyeglass frame front.

Steps

  1. Left-click once in the white space in the Graphics area to de-select the Top plane
  2. Right-click Sketch 2 in the Feature Tree and click Edit.
  3. You can see that this sketch was made with a spline - a multi-point curve.
  4. Click and drag any of spline handles (points) to change the shape of the frame.
  5. Select the green check mark Green Check button to complete the sketch.
  6. If you make a mistake, or if the model isn't able to regenerate properly, click the undo button Undo button at the top to return the model to its previous state.

Note:

It is important to keep the dimensions on the sides of the frame the same so the part can still attach to the rest of the assembly.

Eyeglasses Editing Exercise

View the Results

Changes to a part in Onshape are immediately applied to any assemblies that include that part. The Eyeglasses Assembly uses the Frame-Front part to show what the glasses look like on a manniquin.

Steps

  1. After closing the sketch with the green check, you can see how the glasses look on a manniquin.
  2. Double-left-click on the Eyeglasses Assembly in the feature tree.
  3. If you can't see the Eyeglasses Assembly in the feature tree, click the Toggle tab manager button Toggle tab manager in the bottom-left corner of the window to show the Tab list.
  4. Right-click and drag your mouse around on the model to look at the glasses from different angles
  5. Drop down the Camera and render options menu Camera and render options menu on the right and choose Turn perspective on and Shaded without edges to make the manniquin look more realistic.

Note:

It is important to keep the dimensions on the sides of the frame the same so the part can still attach to the rest of the assembly.

Eyeglasses Editing Exercise

Change the Colors

Customize the color of your glasses frames.

Steps

  1. Double-left-click on Eyeglass-Frame-Front in the Feature Tree to return to the front frame part studio.
  2. Right-click on the Frame-Front part in the parts list (at the bottom of the Feature Tree) and choose Edit appearance, then choose your favorite color.
  3. Select the green check mark Green Check button to complete the color change.
  4. Double-left-click again on Eyeglass Assembly in the Feature Tree to return to the manniquin.
  5. Try doing the same thing to the left and right temple parts too.

Eyeglasses Editing Exercise

Change the Transparency

Simliar to how you adjusted the color, you can customize the transparancy of the glasses frames.

Steps

  1. Double-left-click again on Eyeglass-Frame-Front in the Feature Tree to return to the front frame part studio.
  2. Right-click on the Frame-Front part in the parts list and choose Edit appearance.
  3. Use the transparency slider Transparency slider to set the transparency to some value that you like, for ex: 0.50 for 50%.
  4. Select the green check mark Green Check button to complete the color change.
  5. Double-left-click again on Eyeglass Assembly in the Feature Tree to return to the manniquin.
  6. Try doing the same thing to the left and right temple parts too.

Eyeglasses Editing Exercise

Have a 3d Printer? Export for printing.

Steps

  1. Double-left-click again on Eyeglass-Frame-Front in the Feature Tree to return to the front frame part studio.
  2. Right-click on the Frame-Front part in the parts list and choose Export
  3. Change the export Format to STL and chagne the other setting per the requirements of your printer.
  4. Enjoy!

Eyeglasses Editing Exercise

Congratulations!

Now you have a sense of what a design engineer does to edit and refine a design for a consumer product. Keep playing with these models and see what you can do!

Thanks to Katie Castor of the Tufts University Center for Engineering Education and Outreach for creating this fun exercise!

And thanks to Onshape user Erik Meliska for creating the Public Onshape Glasses document on which this exercise is based.