
5:39
During the winter holidays, it’s not uncommon (and completely forgivable) to let your fitness routine slip a little bit. This makes the new year the perfect time to recommit to hitting the gym or dusting off your running shoes.
The same goes for your CAD skills. If you spent December overindulging on turkey or traveling to grandma’s house, you might have gotten a little rusty with your extrudes and revolves.
Not to fear: Running through a few CAD calisthenics exercises will get you back in tip-top shape. You’ll be ready for your robotics season or senior design project in no time.
A good calisthenics workout, CAD or otherwise, starts with some warm-up exercises and then moves on to challenge the large muscle groups. And it’s nice to end with some timed sprints to put the body to the test.
The Onshape Warm-Up: Click Around
Open a blank Onshape Document and take a minute to familiarize yourself with the interface, maybe while doing some deep breathing. It’s possible that you’ve been using Onshape for years and have never taken the time to carefully look over the interface.
Let’s start with the Document toolbar.

At the top, you’ve got the Onshape logo or your enterprise’s logo. Click on that to take you back to your documents page. Next to that is the Document menu, sometimes called the hamburger. Open that menu to perform document and workspace commands, for example, the underutilized Print command, which can be used to quickly create high-quality images of your designs.
Also in the top Document toolbar, you’ll find links to the Onshape App Store and the Onshape Learning Center. Under the Help menu, you can find, among other things, all of Onshape’s keyboard shortcuts.
Finally, you’ll find your user account menu to access your account preferences and other settings. If you’ve never browsed your account settings, take a minute to do so.
Below the top Document toolbar, you’ll find the feature toolbar.

The first few features are the main muscle groups we will exercise in the next section. But take a minute to scan the entire menu; you might notice one or two features that you’ve never explored, like Boolean, Split, or Transform. Transform is kind of like yoga: wonderfully powerful and effective, but many people shy away from it.
On the left side of the interface, you may have never clicked the Where Used or Performance tabs. Those are very helpful commands to keep in mind when working with large assemblies.
Finally, in the top right corner, you’ll find the view cube and camera and rendering options (did you know you can click and drag those?). Try clicking on the various faces of the view cube, as well as the edges and vertices. Also, try clicking the arrows to rotate the view cube. Then explore all of the options under camera and rendering options. There’s a good chance there are some options in there you’ve never used.
CAD Exercise 1: Sketch Constraints
One of the most important concepts in CAD is design intent. When you are modeling in Onshape, you want your model not just to look like what you had in mind, but also want it to reflect the various relationships embedded in your design. When sketching, using constraints is perhaps the most valuable tool for reflecting design intent.
Look at the example below. It is a fully defined sketch of a 100mm x 100mm square with a square bump out on the top. It also has three equally sized-holes. The design is complete but does a poor job of reflecting various design intent ideas, such as:
- The main shape and the bump out are square.
- The holes are of equal size.
- The top hole is centered in the bump out.
- The bottom holes are centered in the bottom square.
- The bottom square should be centered on the part origin.
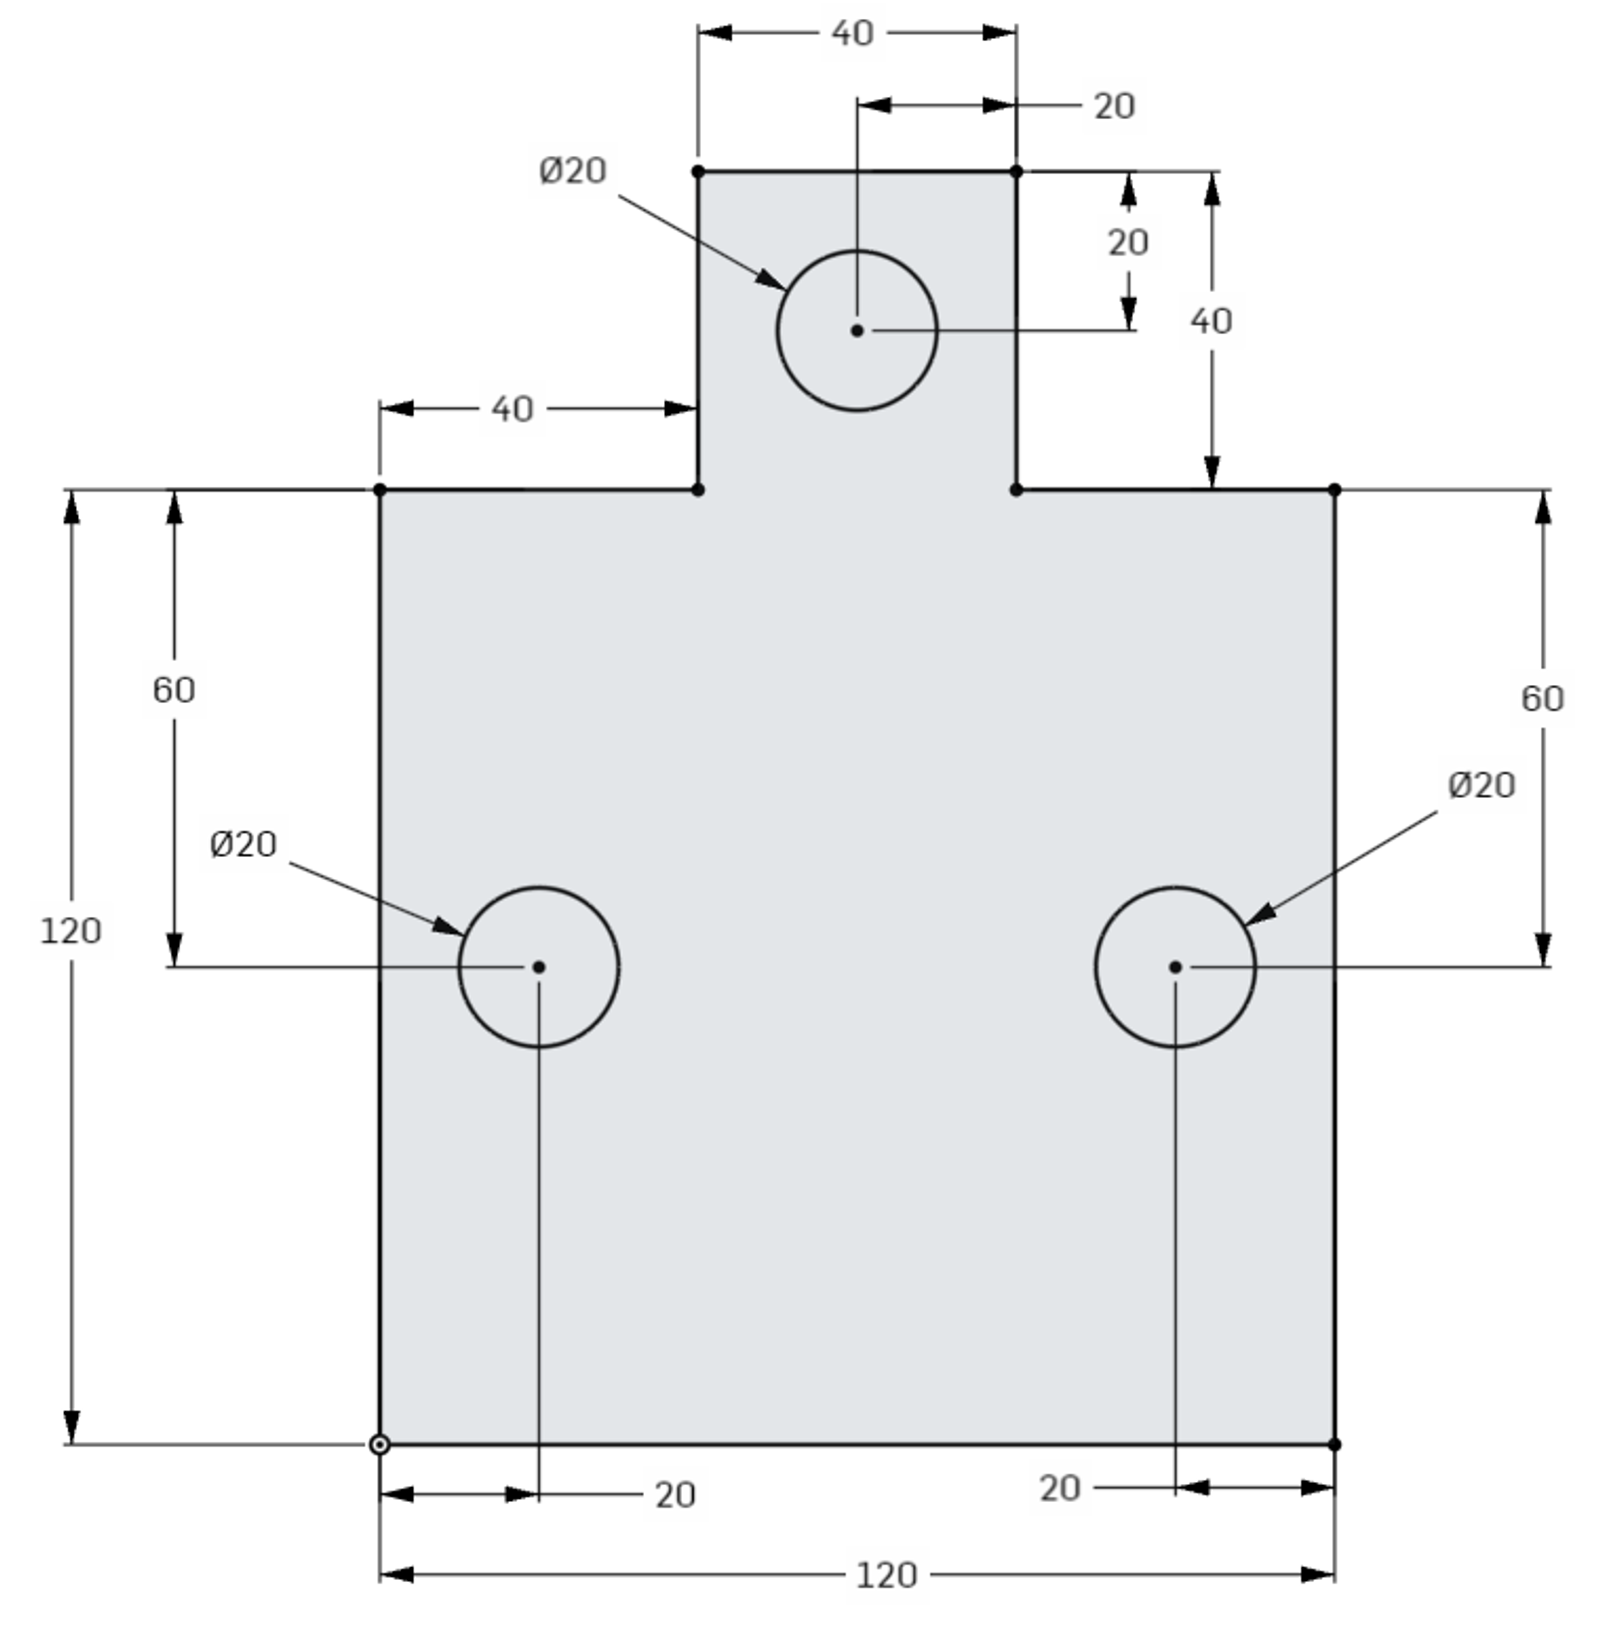
Your exercise: Try recreating this sketch but with better design intent. Use constraints, such as equal and symmetric, and construction geometry to reflect the design intent ideas above with just two dimensions.
CAD Exercise 2: Just Extrudes
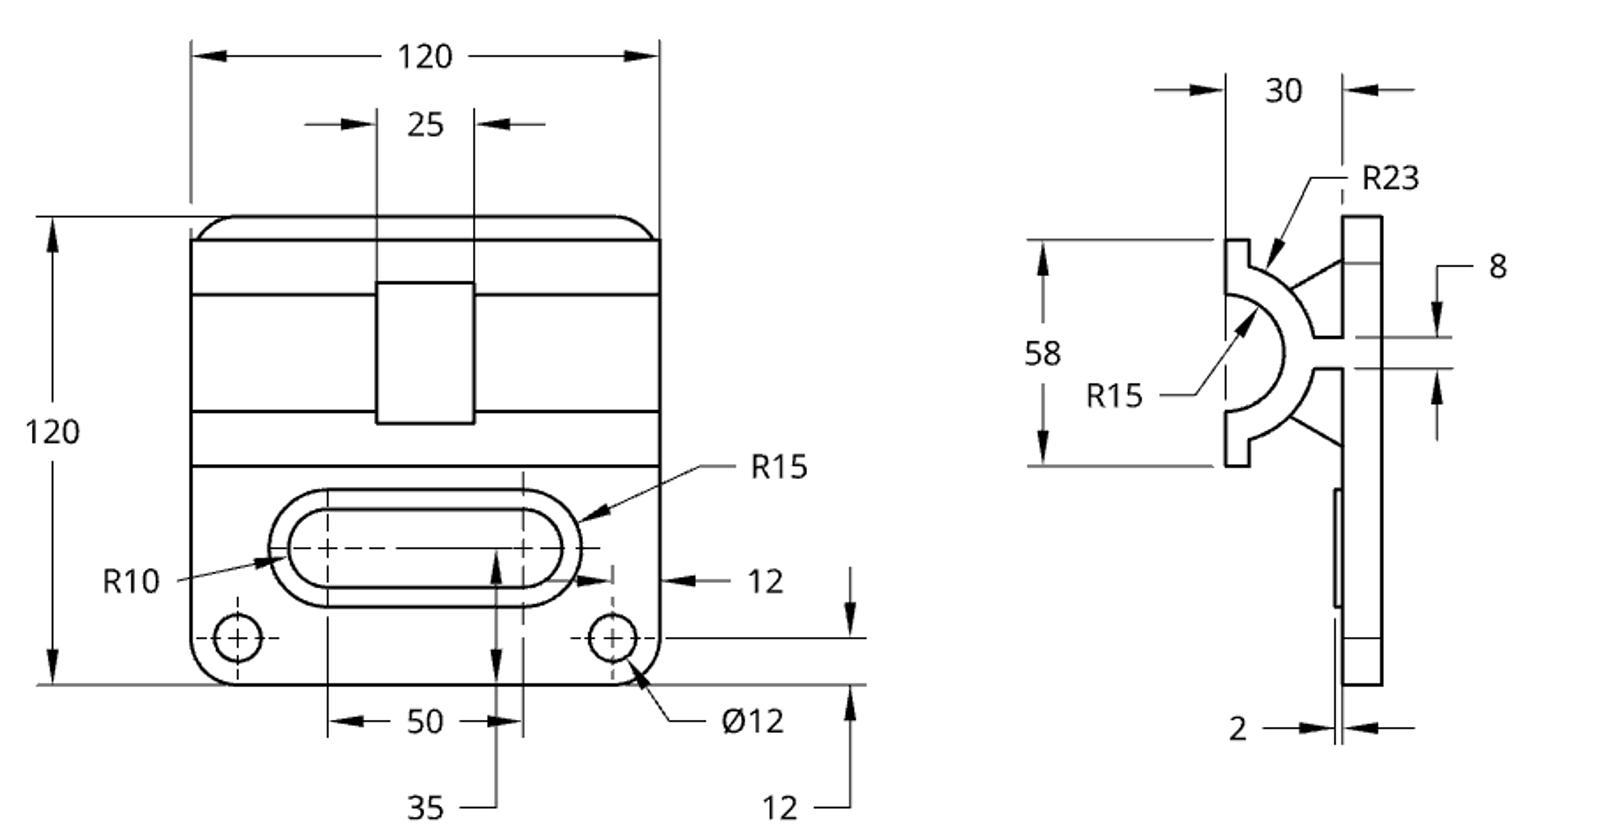
Extrudes are kind of the abdominals of CAD; a strong core makes many of the more subtle movements possible. In this exercise, the goal is to just flex your abs a bit. Try recreating the part below, using just extrudes. Of course, there are other ways to create the part, but using only extrudes this is a good exercise to strengthen this basic skill. No fillets, or holes, or ribs; just extrudes.
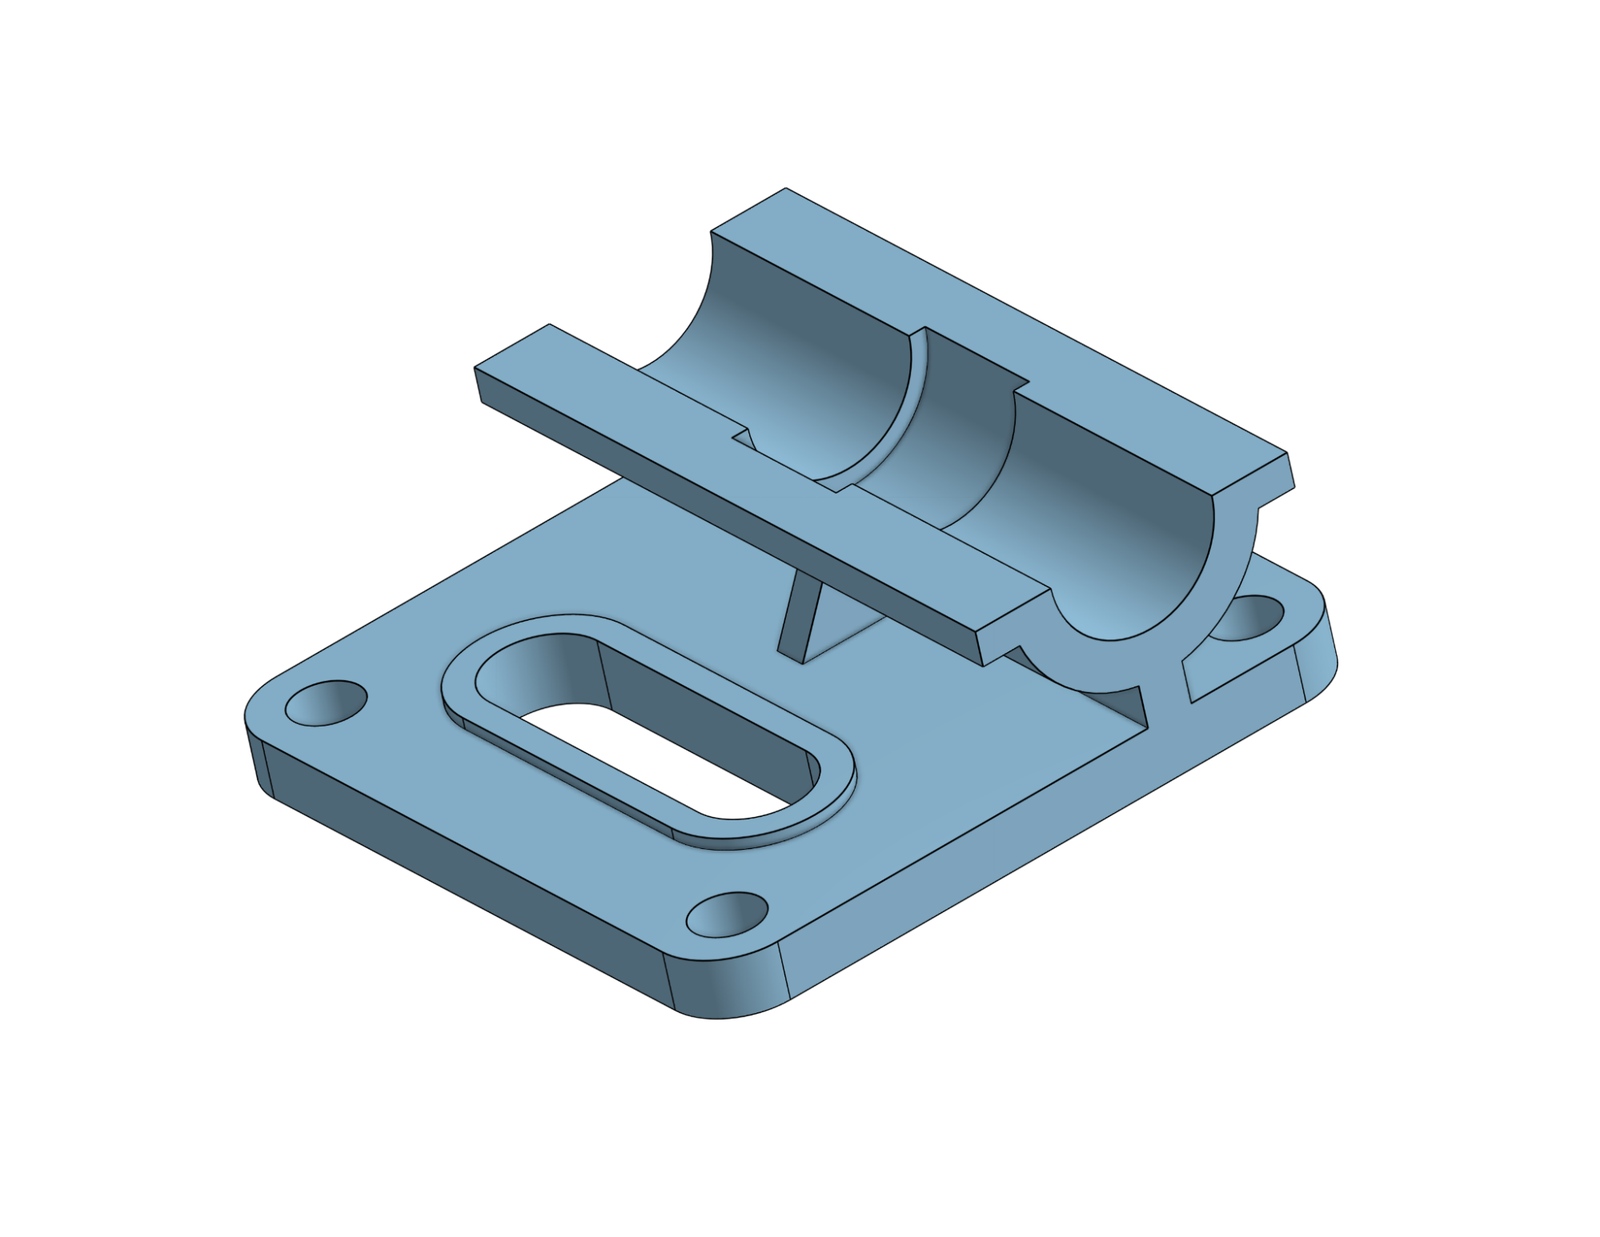
The exact dimensions are up to you, but the drawings below include some basics to get you started.
CAD Exercise 3: Just Revolves
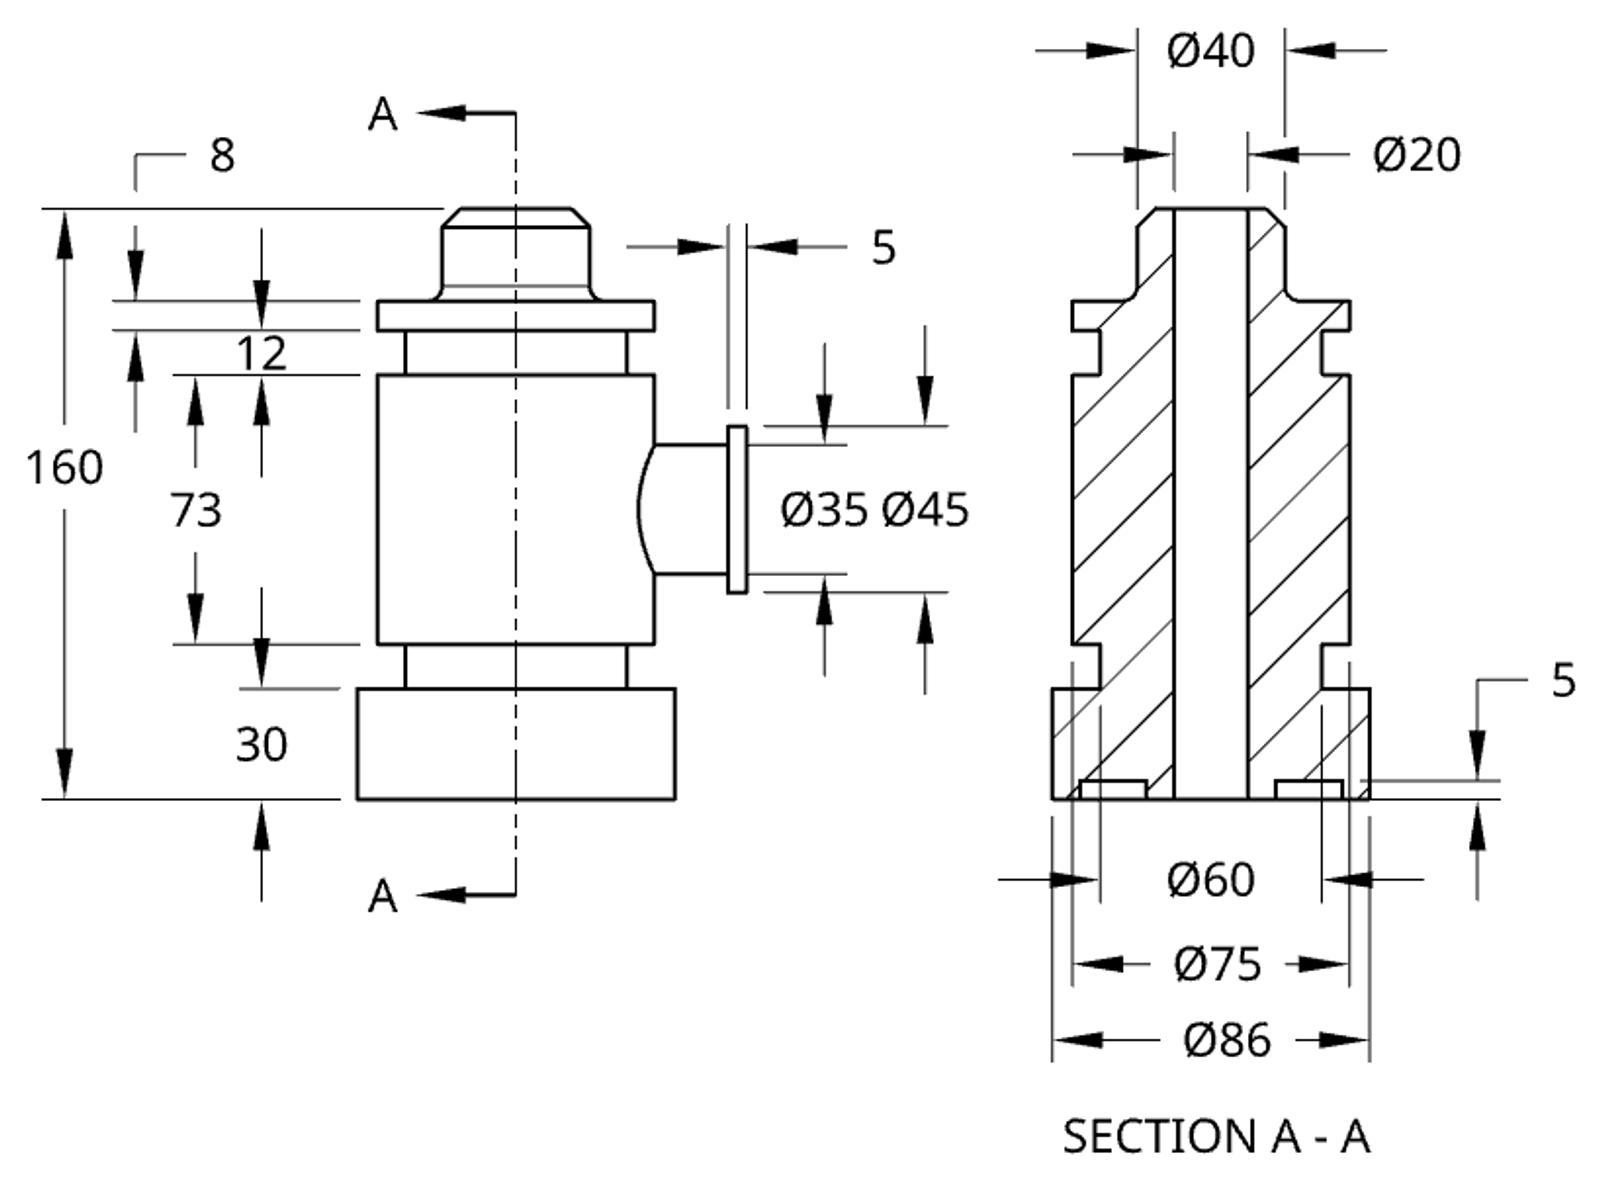
Just about as foundational and important as extrudes, revolves are the core of many CAD parts. Recreate the part below, using only revolve features. Again, no fillets; just revolves.
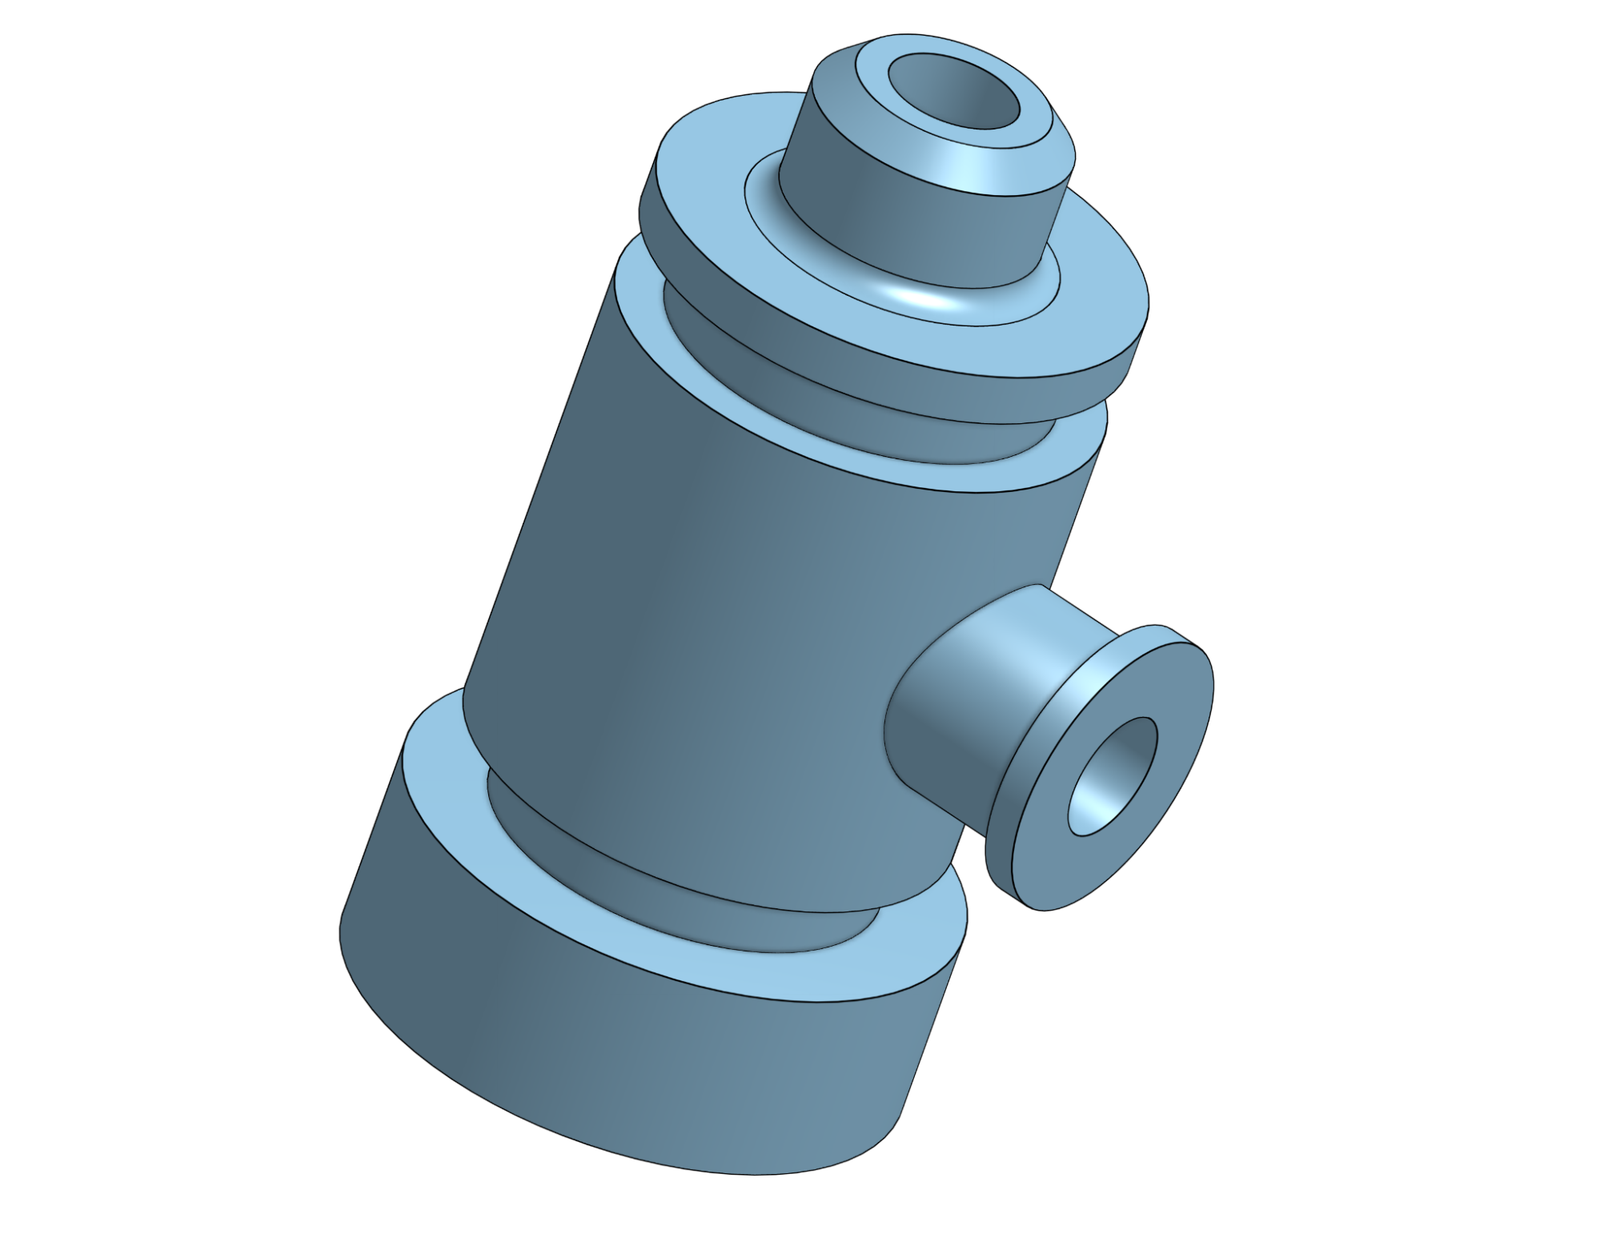
The exact dimensions are up to you, but the drawings below include some basics to get you started.
Keyboard Shortcuts
Before the final exercise, try limbering up your fingers with some keyboard shortcut exercises, a great way to speed up your modeling. In the animation below, you can see how, with keyboard shortcuts, an extrude with four holes can be created in just 30 seconds!
Try it yourself. Open a new Part Studio and try the following:
- Shift+S to begin a new sketch.
- Click a plane.
- N to view your sketch normal to the sketch plane.
- R to create a centerpoint rectangle.
- Immediately type the two dimensions without having to select the dimension tool.
- Q to turn on construction lines and draw another rectangle.
- D to select the dimension tool and create two dimensions.
- C to select the circle tool.
- Draw four circles.
- Type the dimension for the fourth circle without using the dimension tool.
- C or ESC to deselect the circle tool.
- Click the four circles and E to make them equal.
- Shift+E to extrude.
- Enter to complete the extrude.
- P to turn off planes.
Sprints
Whew, that was a great workout. Now let’s wrap up with some quick sprints to put our CAD muscles to the test. The sprint is a speed modeling challenge. The goal is to recreate the flexible shaft coupling from the 2021 Onshape Education Speed Modeling Challenge, seen below.
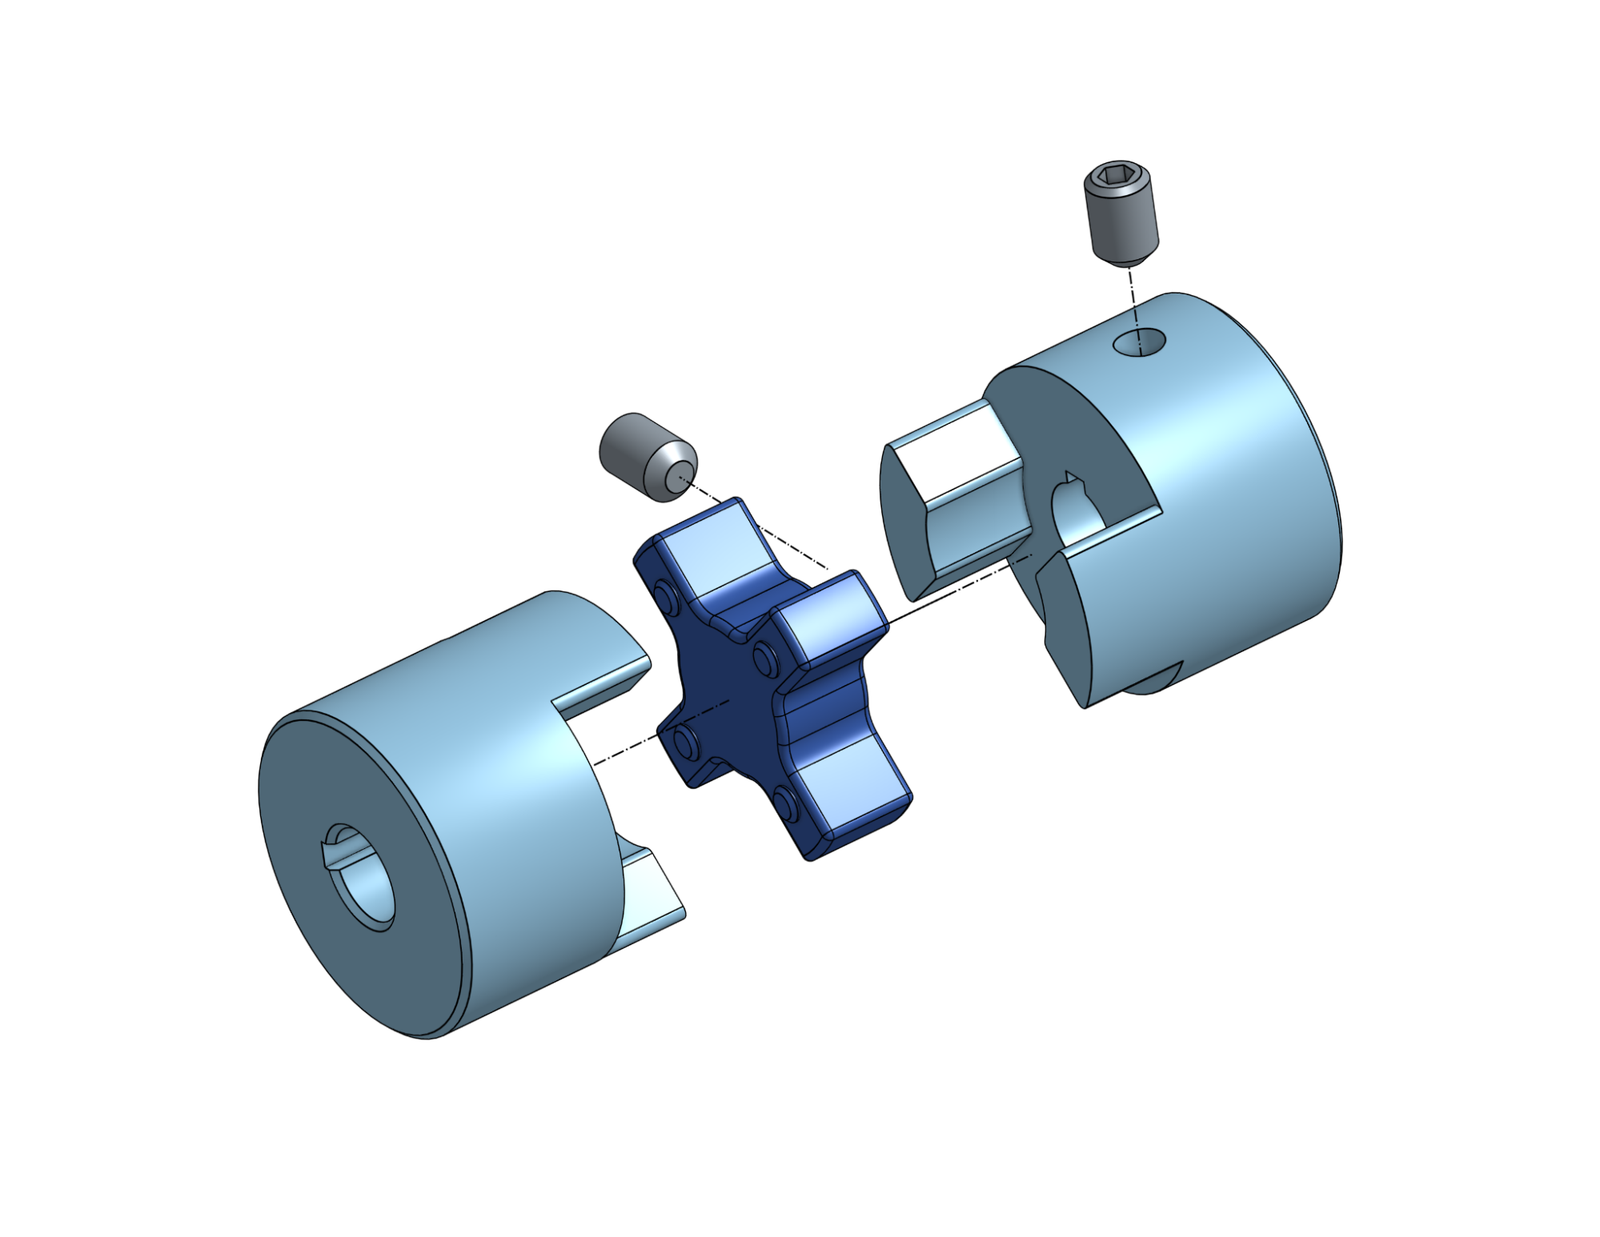
Detailed drawings of the necessary parts are included in the Speed Modeling Challenge Onshape Document. Simply make a copy of the document and get modeling! Can you beat 2021’s speed modeling champion, who modeled the whole assembly in under 3 minutes? Tag us on Twitter, Facebook, Instagram, and LinkedIn, or post to the Onshape Forums to show us your results!
Credit: Special thanks to Ian Gardiner, Senior Mechanical Engineering Specialist at Avidbots, for the inspiring concept of “CAD calisthenics.”
Get Started with Onshape Education
Onshape for Education brings CAD out of the computer lab and into the modern era.
Latest Content

- Case Study
- Robotics
Saga Robotics: Powering the Future of Sustainable Farming with Cloud-Native Onshape
01.05.2026 learn more
- Blog
- Evaluating Onshape
- Simulation
- Rendering
- Surfacing
- Consumer Products
Earlier Validation, Better Outcomes: Onshape’s Approach to Surface Design
02.20.2026 learn more
- Blog
- News from Onshape @ PTC
- Publications
- Configurations
- Data Management
Onshape MBD: Single Source of Truth from Design to Manufacturing and QA
02.23.2026 learn more
- Blog
- Becoming an Expert
- Sheet Metal
Two Views, One Model: Faster Sheet Metal Design in Onshape
02.12.2026 learn more


