12:47
Contrary to popular belief, there is nothing voodoo about B-splines – they are just a tool for expressing splines in a more convenient form.
The basic idea is that we can separate a spline function into a set of control points c, which define an approximate path for the spline, and a set of functions b(t), which give the weighting of each control point at a parameter value t along the curve. The spline may not pass through all or even any of the control points c, but moving the control points allows you to control the path of the curve.
For example, the control points for the spline that we generated in Part 1 of this blog are depicted below:
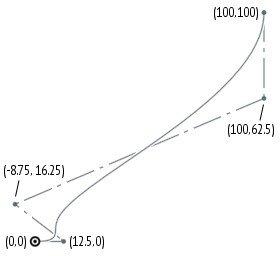
As well as the control points, we need a set of functions b(t), which provides the weighting of the control points at each parameter value t. For example, at t=0.5, the five control points of the spline are weighted according to the vector b(0.5) = [0.00000, 0.16667, 0.44444, 0.35185, 0.03704]. By choosing smooth functions for b(t), we can create a smooth curve that transitions between the control points.
When creating a B-spline, we do not actually need to specify b(t) explicitly — this is automatically constructed to have the required smoothness properties — rather we only need to specify where the knots between the polynomial pieces should be. For the above curve, we want two pieces, one between t=0 and t=0.25, and one between t=0.25 and t=1. To create this B-spline, we would specify the knot vector [0,0,0,0,0.25,1,1,1,1]. Note that when drawing a spline between two fixed endpoints, the first and last knots are always repeated four times to ‘clamp’ the spline to the start and end point. Here is how we could directly define this B-spline in Onshape:

Note that the control points are not the same as the points you specify to skFitSpline(). In this example, the specified points to skFitSpline() were (0,0), (10,10), (100,100) with startDerivative of (150,0) and endDerivative of (0,150), while the corresponding spline control points are (0,0), (12.5,0), (-8.75,16.25), (100,62.5), (100,100).
When using skFitSpline(), Onshape converts the arguments to B-spline control points, which is easily done with a little mathematics. The first and last fit points become the first and last control points. The second and second-last control points can be calculated from the startDerivative and endDerivative in the same way as we did earlier for Bézier curves. The other control points can be derived from the remaining fit points with linear algebra (where s(t) = b(t).c).
Conversely, if you want to define a spline using B-spline control points, you can easily convert it to skFitSpline() form by evaluating it at all of its knots, and calculating the startDerivative and endDerivative using the same equations we used above for Bézier curves.
Why B-Splines?
It can be seen that the B-spline form of a spline has a number of advantages over specifying polynomial co-efficients for each polynomial piece. First, the control points have a more intuitive geometric interpretation than the polynomial co-efficients. Second, if b(t) is chosen to have second-derivative continuity, then s(t) automatically has second-derivative continuity without needing to fit a set of co-efficients that satisfy this criterion. However, there is nothing magic about B-splines: you can calculate the polynomial co-efficients from the B-spline control points, and vice versa, so they are just different representations of the same curves.
Note also that for a single-piece spline with a simple knot vector like [0,0,0,0,1,1,1,1], b(t) is exactly equivalent to the weighting that defines a Bézier curve, and the resulting spline is the same as the Bézier curve with the same control points. More complicated splines can be decomposed into multiple such Bézier pieces. So again, there is nothing more or less powerful about these splines versus a set of Bézier curves joined together. However, the B-spline representation requires less control points for the default case that second-derivative continuity is desired.
Directly Creating 3D Splines in Onshape
There are two FeatureScript functions that can be used for creating splines directly in 3D: opFitSpline() and opCreateBSplineCurve().
opFitSpline() is exactly equivalent to the skFitSpline() function described earlier, except instead of working in the context of a 2D sketch (with an implicit sketch plane), it directly draws a curve in 3D. This can be more convenient than going via a sketch, and the curve need not be constrained to a single plane. The parameters are exactly the same as skFitSpline(), except that all of the points are specified as 3D instead of 2D vectors.
opCreateBSplineCurve() is the most powerful of the spline functions, and also the most daunting. It directly takes a set of B-spline knots and control points. Unlike the other functions, this function lets you create splines of arbitrary degree, not just cubic splines. It also allows you to create closed splines (more on this shortly), and it allows you to create rational splines aka NURBS. I won’t go into rational splines in this article, but they allow you to draw certain curves that wouldn’t otherwise be possible to express in B-spline form.
To demonstrate use of these functions, here’s a 3D object that I’ve created by drawing a closed cross-sectional profile with opCreateBSplineCurve() and a guide path with opFitSpline(). I then swept the profile along the guide path with opSweep() and thickened the resulting surface with opThicken() to create a 3D object.
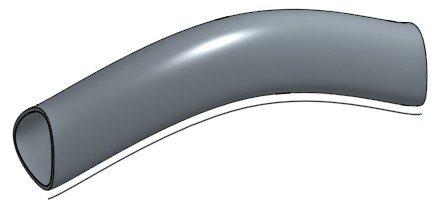
(I’ve left the guide path in the picture for illustration purposes.)
I’m not sure what this object actually is. Perhaps it’s a handle for something, or an art piece for my future Onshape museum. But you can see how this might be useful if we need to create a computed surface in an actual engineering problem. Here is the full code:
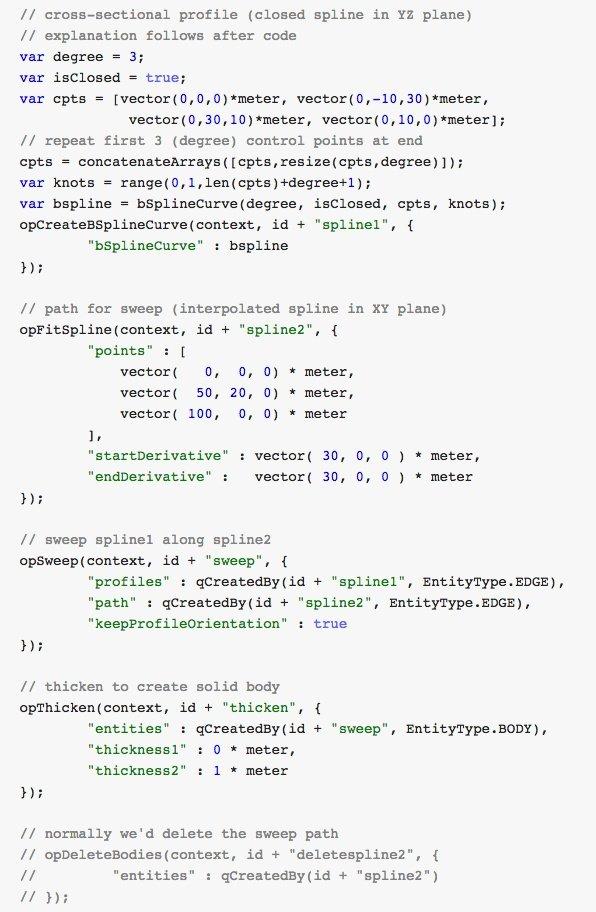
One thing that warrants explanation is how I’ve selected the B-spline parameters to create a closed (‘periodic’) spline. For all of the B-splines discussed in part 1, I repeated the first and last knot four times to ensure that the spline passed through the start and end point (the knot sequences looked like [0,0,0,0,0.25,1,1,1,1], for example). In this case, we don’t need or want to clamp the curve to fixed endpoints. Instead, I’ve chosen a uniform set of knots between t=0 and t=1 ([0,0.1,0.2,…,0.8,0.9,1]). The resulting curve does not pass through the first or last control point, but is still guided by the control polygon. I then repeat the first three control points at the end of the list of control points — wrapping part of the control polygon around the curve a second time — which results in a closed spline.
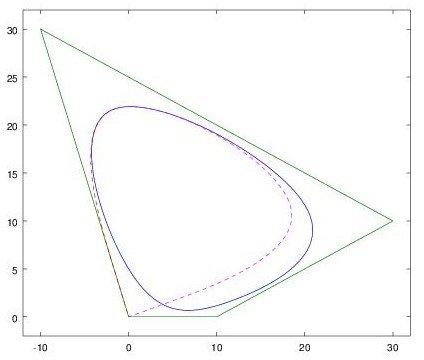
Here is a plot of the spline and control polygon that might help illustrate this. The control polygon starts at the origin (0,0) and goes clockwise around through (-10,30), (30,10), (10,0) and back to (0,0), then retraces (-10,30), (30,10), (10,0). The resulting spline follows the left dotted line from the origin to the top of the egg (from t=0 to t=0.3), traces the egg once (from t=0.3 to t=0.7), and returns to the origin via the right dotted line (from t=0.7 to t=1). When Onshape draws the curve, it only draws the middle part from t=0.3 to t=0.7, so the result is the closed egg shape. (For a spline with degree 3, the outer three knot spans are always ignored when drawing.)
Offset Curves
Sometimes it’s necessary to generate a curve that’s “parallel” to another curve, maintaining a constant distance from it. In CAD, this is called an offset curve. Here is an example in which I’ve drawn a curve and an offset curve at a given distance. I’ve then used the two curves to create a curved object with constant thickness:
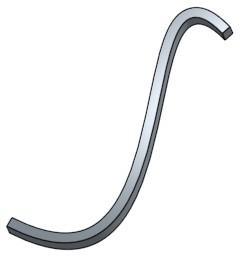
Note that drawing an offset curve is not as simple as translating the curve (moving it in (x,y)). If I were to create this object by copying the bottom curve, dragging the copy towards the top left, and filling in the area between the two, I end up with something that is far from constant thickness:
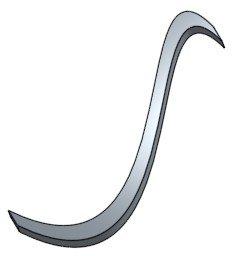
Rather, to create the offset curve, each point on the curve needs to be moved in a slightly different direction: the direction normal to the curve at that point.
The Onshape sketch GUI has an “offset” tool which makes offsetting a curve easy. I needed to do this programmatically in FeatureScript, though, and there are no documented FeatureScript functions for offset curves. It also turns out that it’s not mathematically possible to express the offset curve in a form that could be input as a new B-spline. So how is Onshape doing this?
Onshape has a handy feature that you can view the code generated by the GUI (right click on a Part Studio → View Code). By perusing the code produced by the offset tool, I did eventually figure out how to create an offset curve from FeatureScript.
Offset Curves, Using Onshape Constraints
The key is to create a new spline using skSplineSegment(), and then add a DISTANCE constraint that constrains it to be a certain distance away from the first spline:
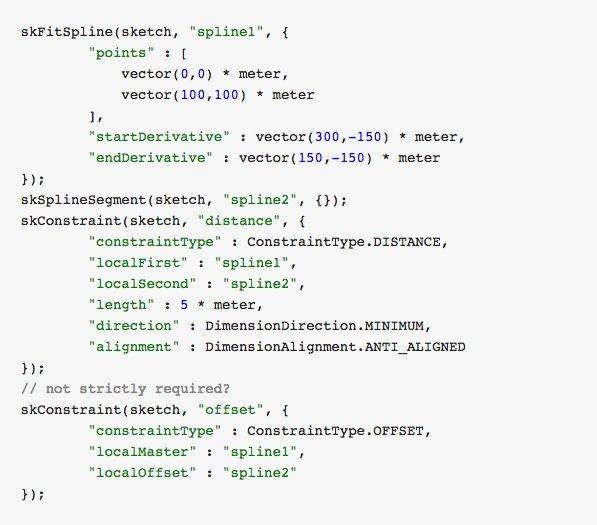
The OFFSET constraint does not seem to be required for the solver to do the right thing here, it may just be for GUI display purposes, but I’ve left it in the code example just in case.
There is one oddity with this. We have not specified any constraints on the endpoints, and sometimes the solver takes more liberty with the second endpoint than you might like. For example, depending on spline parameters, you can get something like this:
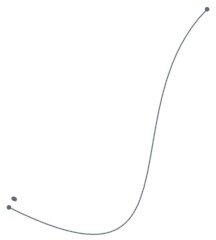
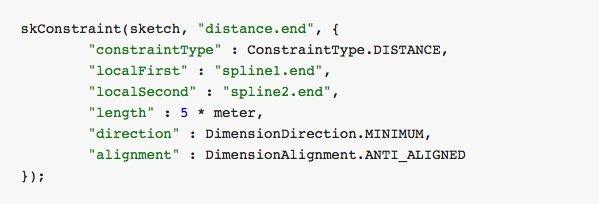
I’ve not been able to figure out the logic of how the solver chooses the second endpoint, however this is of purely academic interest. In practice, the requirements of the CAD problem will usually dictate physical constraints on the endpoints. If you want to force the second curve to end at the same point as the first curve, you can add an extra constraint between the endpoints. For example:
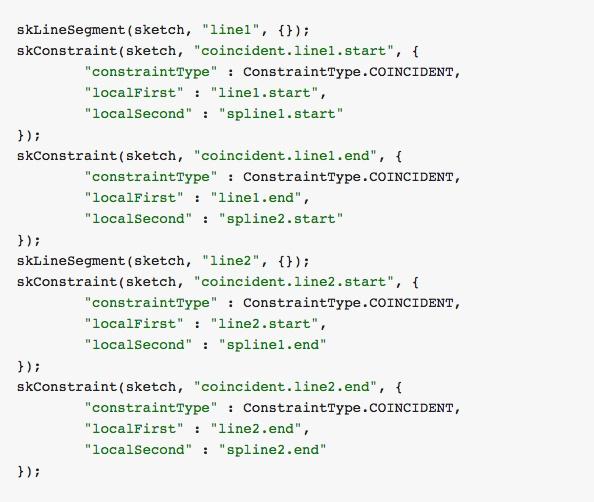
In the earlier picture where I used an offset spline to create a 3D object, I needed to join the spline ends with two line segments to form a face. As in the sketch GUI, this can be done by using COINCIDENT constraints. (The code is simple but rather verbose. If you need many such constraints in your FeatureScript, it may be worth writing a makeCoincident() function.)
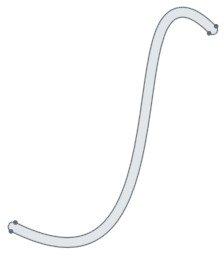
The sketch GUI also has a “slot” tool that allows you to conveniently draw two offset curves, with semicircular end caps. This can be implemented in FeatureScript following the same approach as the above code, replacing skLineSegment() with skArc(). Indeed, under the bonnet, this is what the slot tool generates:
Offset Curves in Onshape
While we can now create an offset curve in a sketch, we still haven’t really answered the question of how Onshape is doing this magic. Have the wizards at Onshape cracked the problem of how to derive offset spline parameters from the original spline?
While their wizardry is impressive, the answer is no. Onshape actually uses a much simpler method. It stores an offset curve as the original spline parameters and an offset value. The points of the offset curve can then be calculated numerically at evaluation time.
Unfortunately, there does not seem to be any way (that I can find) to specify the offset value explicitly when creating a spline. For splines used in sketches, you can use a DISTANCE constraint as shown above, and the solver will assign the right offset to the second spline. This is a little tedious, but works well. However, it can’t be applied to splines created outside of sketches (opFitSpline() or opCreateBSplineCurve()). In this case, there is no way that I can find to specify the offset value. I hope that the ability to specify an explicit offset might be added in a future version.
Side Note on Onshape Rendering
As a side note, while the Onshape computational engine evaluates curve points precisely where needed, the objects displayed in the GUI are built using straight edges. The rendering is not refined as you zoom in. Thus, attempting to visually place elements may produce unexpected results. For example, below is a line segment that is constrained to be co-incident with an spline; in the zoomed-in GUI, there is a gap you could drive a large bacterium through. The line segment does, however, touch the real spline.
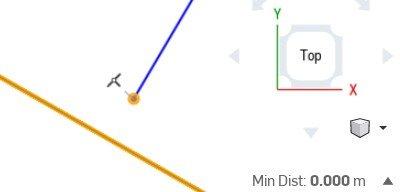
For the most part, the accuracy of the GUI approximation is a moot point. The underlying solver does evaluate the points precisely, and the generated geometry is correct. The take home message is that — as in any parametric CAD system — you should specify any constraints that you need and not rely on visual placement in the GUI.
Offset Curve Self-Intersection
When drawing offset curves on the concave side of a spline, there is a problem that sometimes arises: the offset curve may run into itself (in fact, this always happens for some offset distance, but it’s most problematic when the spline has high curvature). If we blindly plot the curve that results, we see that the offset curve has a loop:
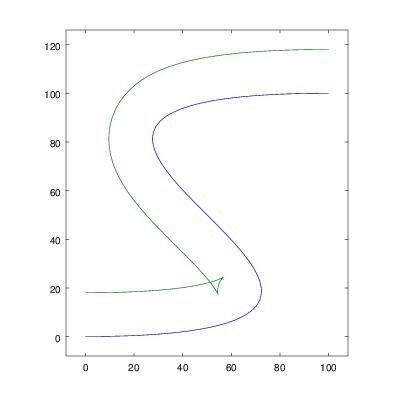
(If you’re surprised by the shape of this loop, take something like an eraser and sweep it along the path. There is a point where the top of the eraser has to start moving in the other direction to make it around the tight bend.)
In this case, Onshape throws up its hands and refuses to create the offset curve. Sometimes this can happen even when one is not explicitly working with offset curves. For instance, the “thicken” operation I used earlier in this article requires the calculation of offset curves, which may fail depending on the thickness value. In that example, a value of 1 meter works okay, but 2 meters fails (in either direction), and it’s not immediately obvious where in the curve the self-intersection is.
There are algorithms that can trim loops from offset curves. Even after trimming the loop, there is still the complication that there is a cusp (vertex) in the curve where the loop was, which changes the geometry of any objects built from this curve. For example, if you were to extrude the above curve, there is now an extra edge in the knee. I’ve noticed that Onshape does not draw splines with cusps, which is likely to avoid this problem of surplus geometry. One way around this would be to interpolate an arc at the cusp, but this clearly involves a lot of added complexity in the computation.
I do hope that Onshape considers supporting some form of offset curve trimming in the future, as well as improving robustness with respect to cusps and other geometry anomalies. While often you do want to know about these anomalies, the current behaviour — where parts can suddenly fail to render after making small changes to parameters — can be quite frustrating when trying to fine-tune your designs.
Wrapping Up (Really!)
Researching this article involved a deeper dive into splines and offset curves, and how to work with them in FeatureScript. I learned a lot in the process, and hopefully this will help you, too, if you find yourself needing to create complex curved objects. Happy designing!
Latest Content
- Blog
- Becoming an Expert
- Assemblies
- Simulation
Mastering Kinematics: A Deeper Dive into Onshape Assemblies, Mates, and Simulation
12.11.2025 learn more
- Blog
- Evaluating Onshape
- Learning Center
AI in CAD: How Onshape Makes Intelligence Part of Your Daily Workflow
12.10.2025 learn more
- Blog
- Evaluating Onshape
- Assemblies
- Drawings
- Features
- Parts
- Sketches
- Branching & Merging
- Release Management
- Documents
- Collaboration
Onshape Explained: 17 Features That Define Cloud-Native CAD
12.05.2025 learn more


