
3:22
When working on assemblies, various elements are often brought into the Assembly from Part Studios, such as parts, sketches, surfaces, and more.
Moreover, maintaining automatic updates in the Assembly when new elements are added to the Part Studio is crucial.
This Tech Tip outlines the process of inserting these elements into the Onshape Assembly while ensuring real-time synchronization and integrity between the Part Studio and Assembly.
Inserting Parts Into an Assembly
Now that your parts are prepared for assembly, insert the first part by clicking Insert on the toolbar.
Insert icon
This opens the Insert Parts and Assemblies dialog, where you can choose parts or Assemblies from the current Document or other Documents.
Additionally, insert Standard Content like bolts, nuts, or washers.
To explore standard content options further, refer to this blog.
In the Insert Parts and Assemblies dialog, switch to see parts, sketches, surfaces, and other entities that are within the current Document. You only see what is available in the Document from which you are inserting.
To insert individual parts, expand the Part Studio and choose the required parts.
Alternatively, click the Part Studio to insert all parts at once, which avoids selecting individual parts.
This method does not keep the Part Studio reference; instead, it references the parts. Any new parts created in the Part Studio do not automatically appear in the Assembly.
After choosing the parts in the dialog, place them in the Assembly.
Clicking in the graphics area places the selected parts where you click. Alternatively, selecting the dialog checkmark positions the part as originally modeled in the Part Studio.
In the Instances list, each inserted part is listed separately with its icon. The constraints between them are not maintained as they were in the Part Studio. To maintain the constraints between parts after they are inserted into the Assembly, reassemble them or group them together.
In the Instances list or graphics area, select the parts, then choose the Group icon from the Assembly toolbar.
Group icon
This action recreates all the mates used to assemble the parts, ensuring they remain fixed and preventing any movement or changes in orientation relative to each other.
When a new part is created in a Part Studio, it does not automatically appear in the Assembly. Instead, use the Insert command again to add it. This process can become time-consuming, particularly when dealing with multiple new parts spread across different Part Studios.
This process can also be applied to other entities, such as sketches, surfaces, composite parts, and flat patterns.
This adds complexity to the insertion process that requires searching for and inserting each one individually. This process takes time and may result in parts being overlooked.
Sustaining Part Studio Consistency
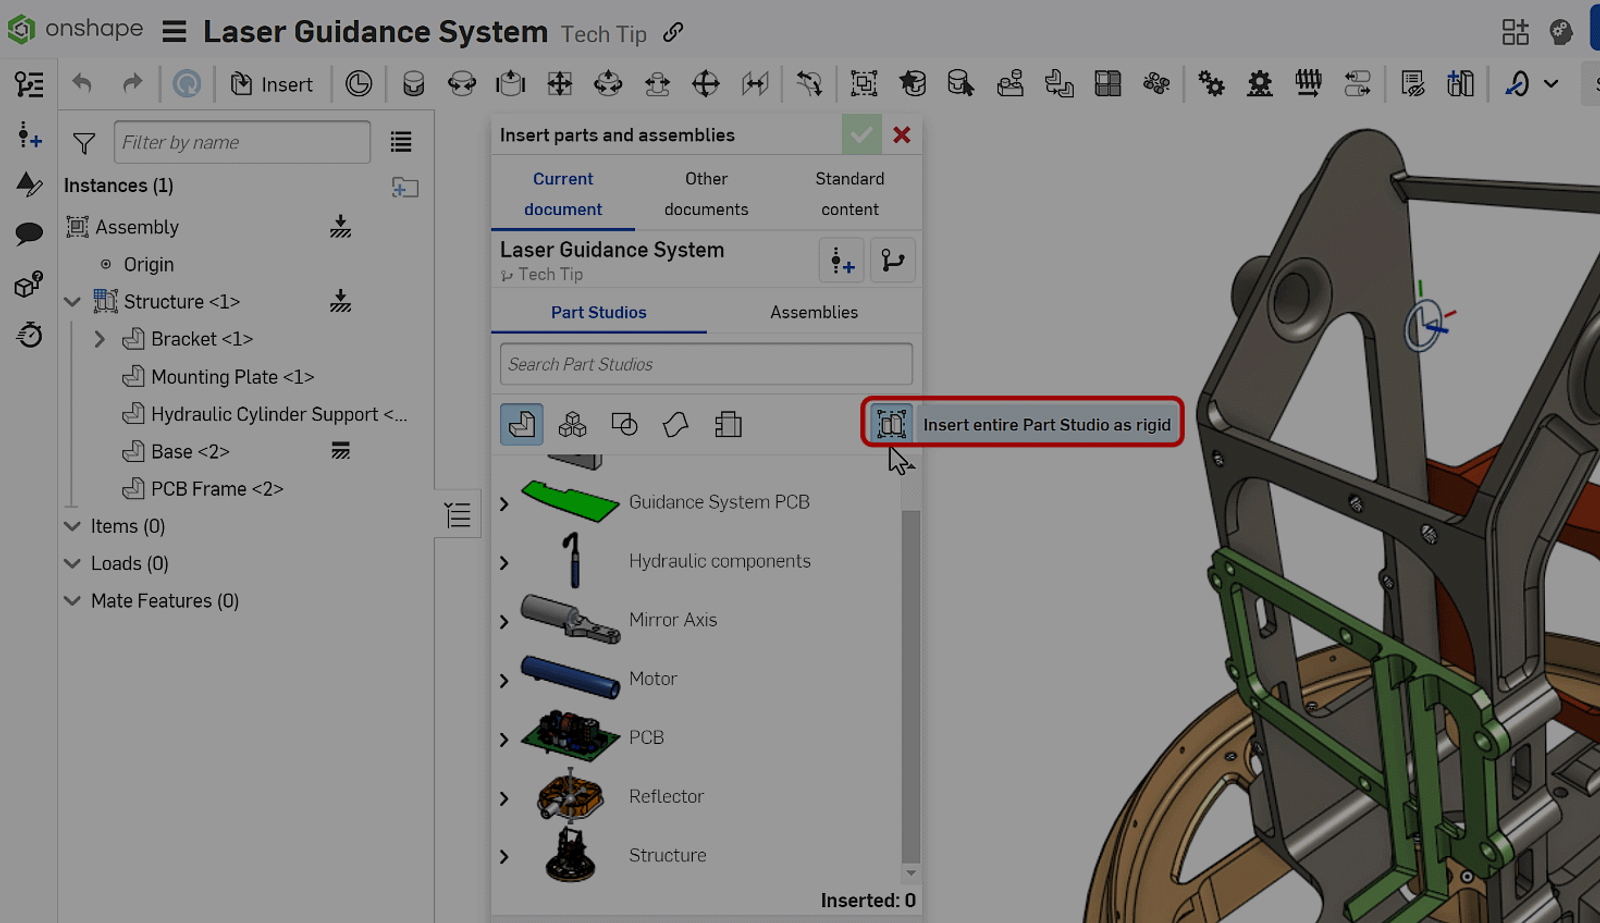
An alternative approach is to insert the entire Part Studio as a single entity, ensuring that any Part Studio updates are also reflected in the Assembly.
Select the entire Insert Part Studio as Rigid option in the dialog, and then choose the Part Studio to insert. Once inserted, the Part Studio is listed in the Assembly Instances list. Expand it to access all elements, including parts, surfaces, and sketches, providing full control to edit them as needed (hide, suppress, export).
Rigid icon
In the Part Studio, if changes are made or new parts are added, all updates made to the Part Studio are automatically synced when returning to the Assembly. Additionally, the constraints between the parts are preserved, ensuring they remain grouped together and eliminating the need for reassembly.
To edit the inserted Part Studio, right-click on it in the Instances list and select Edit from the context menu. Selectively include or exclude different entity types as required.
Additionally, switch to an alternative Part Studio configuration from the Configuration dropdown, enhancing design process flexibility.
This Tech Tip explained how to maintain consistency and integrity between Part Studios and Assemblies, ensuring that any updates made within the Part Studios are accurately reflected in the Assemblies.
Interested in learning more Onshape Tech Tips? You can review the most recent technical blogs here.
Friends Don’t Let Friends Use Old CAD!
Know a colleague who could benefit from our cloud-native, fully-featured collaborative design platform?
Latest Content
- Blog
- Becoming an Expert
- Assemblies
Built to Scale: Why Large Assemblies Don’t Slow Down in Onshape
07.16.2026 learn more- Blog
- News from Onshape @ PTC
- Artificial Intelligence
Onshape Labs: AI in CAD Guided by Designers, Driven by Innovation
07.15.2026 learn more- Blog
- Evaluating Onshape
- Data Management
- Collaboration
- Artificial Intelligence
How the Most Underrated CAD Feature Improves Design Workflows
07.09.2026 learn more