
7:14
This is Grocery Bot.
Grocery Bots final design before my internship at Onshape.
The purpose of Grocery Bot is to teach kids how artificial intelligence (AI) works through machine learning.
Toy Teaching Machine Learning
Reminiscent of a fruit scale, Grocery Bot uses a LEGO Education color sensor that takes a reading of the color in front of it whenever a force sensor is pressed. The kids will put either an apple, banana, or orange in front of the color sensor and press any one of the fruit buttons.
Kids, with the help of an adult, will learn to take multiple "snapshots" of the fruit and then ask Grocery Bot to show the color of the fruit. When the question mark button is pressed, the color sensor will take a reading and light up a red, yellow, or orange LED.
The learning aspect shines when the light displays the incorrect color and the student often concludes that the robot did not learn, i.e., that the color red corresponds to an apple.
Kids are incentivized to take more "snapshots" of the fruit until Grocery Bot is able to present the correct color. They also discover that some fruits have several hues and colors, and that the robot toy has to learn the color palette that comes with all these fruits.
Rendered images of Grocery Bot's final iteration.
I first designed this Grocery Bot at Tufts University for an engineering class geared toward teaching artificial intelligence to kids. It was later optimized during my summer 2022 internship at Onshape.
The bot was fully designed in Onshape, using LEGO Spike Prime parts and backed by machine learning.
Here’s why I built Grocery Bot, and how Onshape helped me become a better designer.
Designing an AI-Driven Toy in Onshape
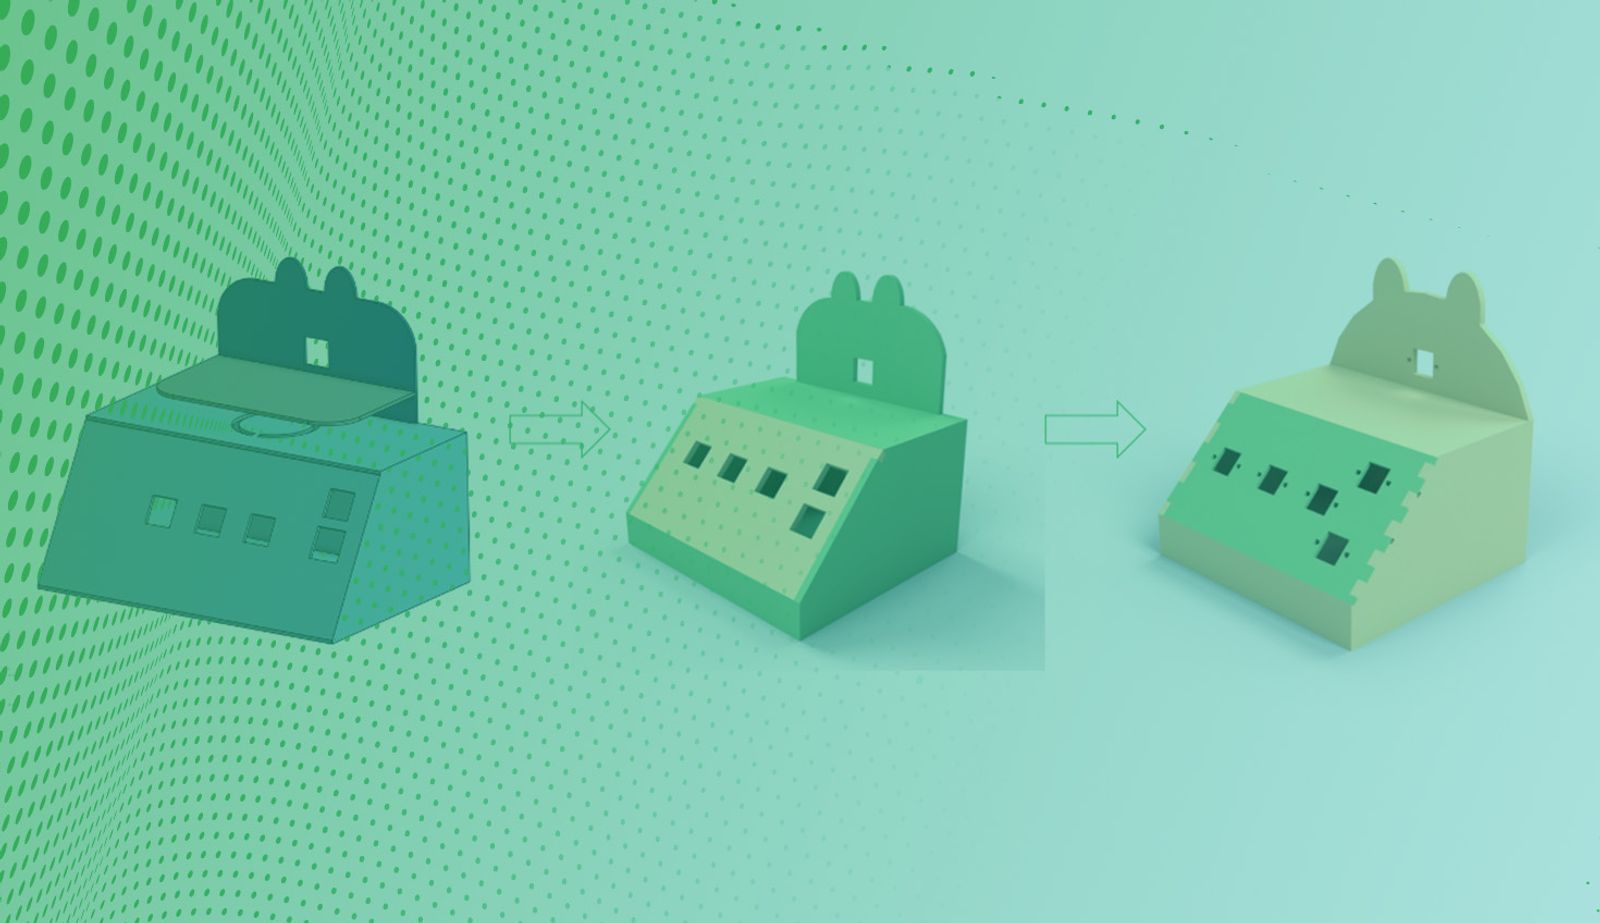
Grocery Bot went through three full iterations to get to the final product.
Right off the bat, I was able to utilize the many benefits provided by Onshape. The cloud-native CAD platform allowed me to keep track of each iteration all within the same Onshape Document. I was also able to access the CAD data from anywhere, at any time.
The three iterations of Grocery Bot.
With those tools at hand, I was able to iterate several designs and test for the most appealing size and appearance for kids.
For example, in the version tree below, you can see different versions for the front panel, as well as modified walls for the top of the scale.
All iterations of this toy were manufactured and tested by kids, which gave me time to improve on the fun and safety aspects of the toy.
Since Onshape allows me to address and edit parts in context to one another, it was effortless to reduce the number of parts and optimize the overall assembly within the same Document.
Two Ways Onshape’s Custom Features Saved Me
But first, what are Custom Features?
That was the question I had during my first week interning at Onshape. I’ve never heard of the concept of a personalized feature before.
Onshape runs on a language called FeatureScript, which is the base for all of its functionality. A feature is something like extrude, fillet, or shell. Users can program their own features using this language and can share their features with the Onshape community. With this function, I could find features that designed multidirectional extrudes, threads, and laser joints.
So, how did Onshape Custom Features save me?
Designing for Laser Cutting
Working with laser cutters can be a tedious and challenging task. Oftentimes, laser sketches require third-party software to lay out parts, assign colors, and line thicknesses to all polylines.
Then, for the machine to process a cut, there are often strict requirements for line thickness and colors.
To move all your parts over to the third-party software, the standard procedure would be to download all the files, open them up in different tabs, and manually copy all of the necessary pieces onto one tab for layout.
Before Onshape, this was a regular issue for me whenever I had a project to create. In the machine shop at Tufts University, students usually schedule one- or two-hour-long time slots with the laser cutter just to get through the software and cuts.
This is true for many machine shops, where several users need to share one to two laser cutters, production is bottlenecked by software setup. Each user imports their file into something like Adobe Illustrator in order to modify all the features, prepare the layout within the area of their material, and then export a separate PDF or SVG file to the laser cutter software itself. This process can take up to an hour per user.
With Onshape, you can cut that time in half and save yourself the frustration of waiting in a laser cutting queue. Ultimately, Onshape optimizes your shop productivity, freeing up bottlenecks in production.
The Laser Joint Custom Feature
In particular, the Laser Joint Custom Feature saved me hours of work by turning my six-hour line-drawn box into a 20-minute sketch up and allowing me to design attachments beyond a simple six-sided box.
The number of joints and offsets set the design, positively impacting both planks that will be adjoined to one another. Each panel can have a tailored customization for the bot.
Grocery Bot was originally designed to be manufactured with quarter-inch plywood and line-drawn dimensioned joints to fit as such. You can see how overwhelming this original sketch was below. Now imagine doing this for each side – I was nearly in tears!
Once I found the Laser Joint Custom Feature, I could quickly adjust dimensions to fit any thickness material. This is a must for any last-minute material alterations.
I attempted to adjust all the sides to fit my new constraints, which added nearly 2 hours of work before I finally utilized the Custom Feature. Then I thought it couldn’t get any easier.
The Auto Layout Custom Feature
If you’re looking to laser cut pieces for your project, they might all exist in your Part Studio or assembly in relation to each other.
Through the use of a Custom Feature called Auto Layout, you can flatten all your parts right in the Part Studio.
Here’s how the Auto Layout Custom Feature works: When setting the thickness of your material, it will automatically identify parts that contain that thickness and spread them out within the bounds of your cut sheet.
This not only identifies the most efficient layout, but how many sheets of material you will need, automatically adjustable if material changes are made.
For Grocery Bot, two auto layouts are necessary for two different material thicknesses. This only delineates them out of convenience, but both layouts can cut through any required thickness material.
To create a blank drawing in Onshape, select the following and click OK. This will bring you to a completely blank space to which we can format the layout before moving to the laser cutter software.
Setting up your drawing template.
When a new drawing is opened you can insert parts and assemblies. By clicking Part Studios, you can insert individual parts or the entire studio.
In this case, we’ll insert the entire studio. You can select the appropriate orientation and, for the purpose of exporting, select a 1:1 view scale.
(The 1:4 view shown in the above image is simply to see the full scope of the model.)
All thicknesses can be in the same drawing if you prefer to crop your file later, or you can hide and show separate parts before inserting into the drawing space.
Here’s my layout for the Grocery Bot:
Additional Laser Cutting Tips
Most laser-cutting software can only process black or red lines of 0.001” thickness.
Red lines are for through cuts, while black lines are for etching and design work.
In drawing properties, you can specify the overall color choice.
If you wish to indicate certain lines as red, right-click and select adjust line style.
You can hand-pick specified lines and adjust the thickness if needed. This would identify the through cuts.
The color must be specified as exactly 255, 0, 0 for red, and 0, 0, 0, for black in the RGB value space.
At this time, Onshape does not provide a thin enough line to accommodate a laser cutter, but still reduces your time in a third-party software to only one step, with layout and color already assigned.
When the drawing is complete, just export it as a DXF file, which can be easily processed by any polyline editing software for your final modification.
And with that, I was able to replicate and improve upon the original Grocery Bot!
Onshape for Education
Get started with Onshape and join millions of students and educators worldwide.
Latest Content
- Case Study
- Robotics
How Fauna Robotics Is Leading Humanoid Robot Development with Cloud-Native CAD & PDM
03.30.2026 learn more- Blog
- Evaluating Onshape
- Electronics
- Integrations
- PCB Studio
How Onshape PCB Studio Pulls 3D Component Models Straight from Altium 365
05.21.2026 learn more- Blog
- Evaluating Onshape
- Collaboration
- Data Management
What’s the Difference Between File-Based and Cloud CAD?
05.20.2026 learn more- Blog
- Customers & Case Studies
- Arena PLM Connection
The Cloud-Native Workflow Behind Coco’s Next-Gen Delivery Robot
05.14.2026 learn more