
3:25
When creating designs that use Configurations, you may want to provide users incorporating the configured product into their designs with separate configuration inputs. For example, when creating a pipe flange, you may want to create a dropdown list that specifies the nominal size and a second option for defining the pressure rating of the flange.
This can create a challenge in that the pressure rating might change dimensional values defined by the original Nominal Size input, such as the number of mounting holes. Users might decide to create additional list choices for the Nominal Size that include the pressure rating. However, this ultimately creates a lot of extra choices the user must scroll through when selecting the correct part for their design.
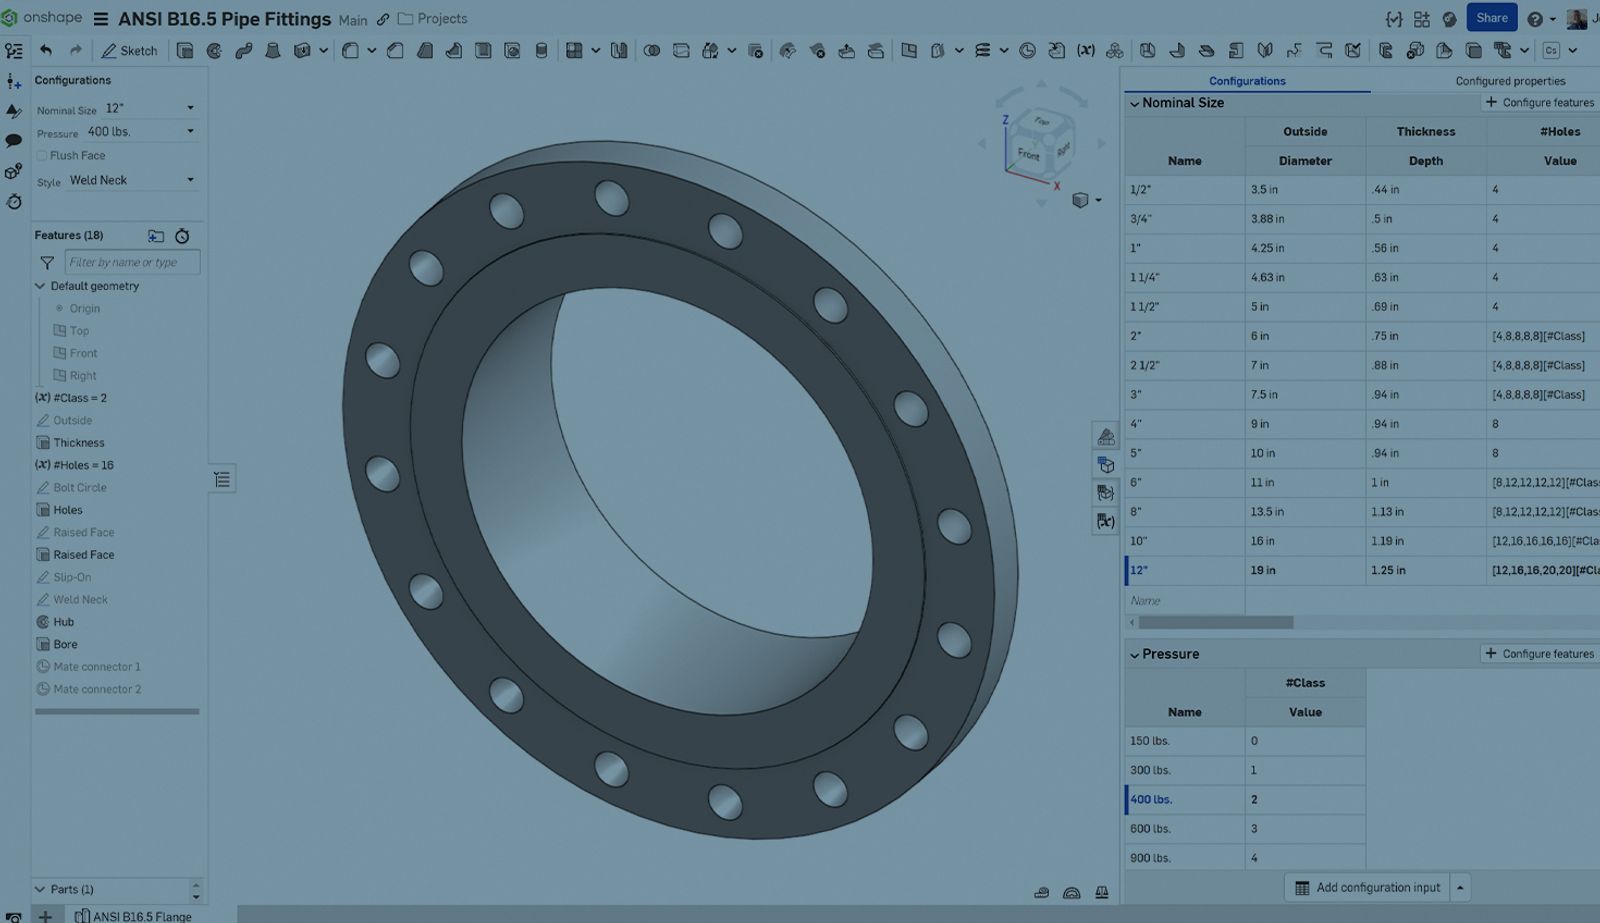
In the image below, nearly every flange size has an additional configuration, while the 12” flange has three separate choices. Optimally, the end user would be provided a list of only nominal values and a separate pressure rating selection.
Arrays and Index
This is where arrays and another Configuration input can be really useful, simplifying the selection process for the end user. Before incorporating Variable arrays into Configurations, it is important to understand how an array and index value works.
An array is a list of comma-separated values surrounded by brackets. For the number of holes in the 12” flange, the array is [12, 16, 16, 20, 20]. Each value corresponds to a different pressure rating (150 lbs., 300 lbs., 400 lbs., 600 lbs., and 900 lbs.).
In order to select a value from the array you provide an index value immediately following the array in brackets. The index is a whole number used to select which value from the list to use and is zero-based, meaning the index numbering starts at 0, not 1, and continues upward incrementally.
Using the previous example, the array and index is [12, 16, 16, 20, 20][0].
The next thing required is a way to control the index value.
Select the Index with a Configuration Input
For our pipe flange, another Configuration input is required to define the pressure rating. There are a few ways to do this, but for this example, another Configuration list is used that contains the 5 pressure ratings (150 lbs., 300 lbs., 400 lbs., 600 lbs., and 900 lbs.). The index values in our example would increment from 0 to 4.
To have this selection drive our index, you can use a Variable in the Feature List. The Variable must appear before any feature that uses it. You can name the Variable anything you want. In the example below, it is named #Class. The Variable must be a Number, not a Length or Angle.
Now that the Variable is created, its value can be configured to the Pressure list, where it will be set to 0 through 4 based on the selection.
The equation for selecting our array value using the #Class Variable as our Index value for the 12” flange hole count is [12, 16, 16, 20, 20][#Class]. Therefore, if a user selects the 600 lbs. Pressure value, the index value changes to 3, which corresponds to the fourth value in the array, 20.
Bringing It All Together
All that is left is to remove the unnecessary rows from the original table and change the instance count of the holes for each size to use the appropriate array along with the #Class variable as the index. This solution is also flexible. For example, there are some flanges where the number of holes never changes, others where the number of holes changes only twice, and some, as our 12” hole example, where the value changes three times.
If you would like to see a video on how this entire part was configured in Onshape, plus more on Configurations, watch the video below:
If you want to dig deeper into this model and see a few more advanced techniques using equations, you can check out this public model as well.
Interested in learning more Onshape Tech Tips? You can review the most recent technical blogs here.
The Onshape Learning Center
Take self-paced courses, read articles, or sign up for an instructor-led training session.
Latest Content
- Blog
- Becoming an Expert
- Assemblies
Built to Scale: Why Large Assemblies Don’t Slow Down in Onshape
07.16.2026 learn more- Blog
- News from Onshape @ PTC
- Artificial Intelligence
Onshape Labs: AI in CAD Guided by Designers, Driven by Innovation
07.15.2026 learn more- Blog
- Evaluating Onshape
- Data Management
- Collaboration
- Artificial Intelligence
How the Most Underrated CAD Feature Improves Design Workflows
07.09.2026 learn more