
04:45
For many years, I designed hardware: Plastic injection molding, metal stampings, turned and milled parts, PCBs, etchings, and the works.
Nowadays, I am a software developer at Onshape, working on expanding our surfacing toolset.
When I make hardware (rarely), it’s usually on my laser cutter, which only cuts 2D parts but cuts them very carefully. So when the Onshape internal design competition started, I wanted to try something a little different, something inspired by Lovepop, a Boston-based card company that makes exquisite gift cards. They are not a customer yet, but I’m hoping they’ll read this blog post and sign up for a trial!
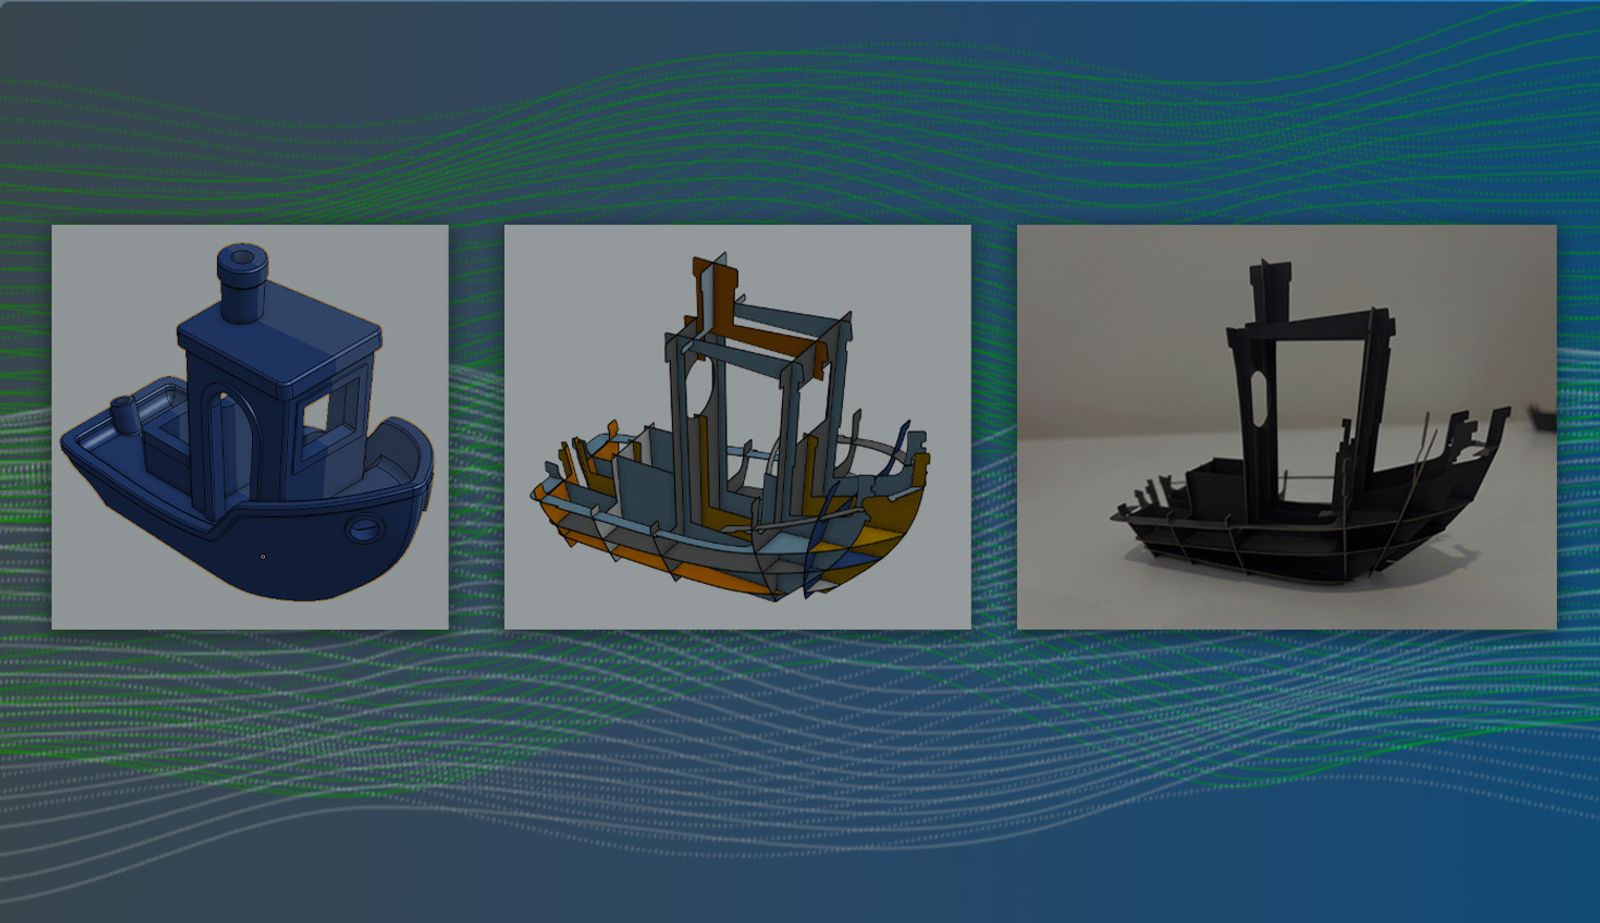
The Result: Papercraft Benchy
(and the FeatureScript Tools to Make It)
Most CAD tools aren’t specifically designed to make papercraft! But in Onshape, designers aren’t limited to just the provided tools. Everyone can write their own tools using FeatureScript and share them with the community.
But first, I had to design the model.
If you are a 3D printing enthusiast you already know why I chose this little tugboat, but if not: Benchy is a 3D printing rite of passage. It is a handsome little vessel with a lot of difficult-to-print features, making it the perfect model to evaluate printer performance. While my papercraft project doesn’t quite qualify as 3D printing, it was a natural place to start.
While Benchy models are everywhere, they are all STL files, a venerable and ancient format that represents 3D objects approximately, with surfaces composed of many thousands of small triangles:
This is similar to how video games and movies represent 3D objects. Modern CAD, on the other hand, uses boundary representation to define and store points, edges, faces, surfaces, and the topological relationships between them – a more sophisticated, powerful, and much more complex approach. This difference is the foundation of modern parametric CAD and makes all our fancy tools possible.
While Onshape works well with STL, I needed a true surface representation to manipulate, section, slice, and lay out the slices of paper. A triangular approximation like STL just wouldn’t work. So, I jumped into Onshape’s Surface tools and went to work. If you want to take a look at the model and see how I modeled it, you can find it by clicking the button below.
A brief digression on the value of internal competitions: Because of my experience surfacing this Benchy model, I saw a need and jumped at the opportunity to join the surfacing tools group at work. Awesome new surfacing tools are coming down the pipe – stay tuned!
If anyone gets inspired to do their own papercraft project but is dismayed by the modeling work – don’t sweat it! While making Benchy, my colleagues Ben Verdier and Jake Rosenfeld released Onshape’s Mixed Modeling, which makes working with “mesh data” like STLs a whole lot simpler and more powerful.
I could have skipped that whole step, is what I’m saying. Sigh.
Next, the tools.
Using Custom Features to Build 3D Benchy
Onshape is a great tool for engineers and with some Custom Features written in our language FeatureScript, it can also be a great tool for paper crafters. I wrote a collection of public, shared Custom Features that each complete a piece of the process:
- Euler Plane: Drag and rotate planes in a Part Studio.
- Pattern Plane: Create sets of evenly spaced planes.
- Create Slices: Create 2D sections from a solid body and a set of planes.
- Joint: Create the intersections between slices, allowing easy fine-tuning for aesthetics, fit, ease of assembly, size, and strength.
- Layout: Organize these pieces back into sheets for laser cutting.
There’s quite a bit here, so I’ll walk through each one and explain how it works on a simpler model I call the Papercraft Wave:
Euler Plane: Getting the right section in the right location and orientation is more artistry than engineering in papercraft, so I made it easy to create, drag, and reorient planes:
Pattern Plane: For many papercraft models, we would like a grid of paper parts, evenly spaced. But it can be a bit fiddly, so I made it easy to adjust the spacing, number, and total span of planes.
Create Slices: Now that we have a solid body and the planes that define our slices, let’s get to work!
Joint: When making interlocking parts in a grid, I want one part to fit into multiple other parts. In addition, I wanted to adjust how much of the joint slot is cut from one part or the other. Last, after attempting a few prototypes I realized that adding chamfers at the slots made assembly much easier.
Layout: After the papercraft slices are designed, we have to laser cut them. The Layout tool can organize the pieces on a plane for cutting.
And here’s how it all worked in practice:
Benchy uses the same set of tools:
And here’s an early version of Benchy, sailing the paper seas:
That’s how I made Papercraft Benchy, start to finish. I hope you like it!
Get Started with Custom Features
If this article inspires you to dive further into FeatureScript, our very own Lindsay Early has written a Learning Pathway to help you get started.
Onshape also curates a collection of stellar Custom Features you can find here. (Personal fave: Point Pattern.)
If you’re interested in making some papercraft of your own, you can find and use all my papercraft tools here. If you design some papercraft, please share it on the Onshape Forums and shoot me an email. And if you ask super nicely I can laser cut them for you!
Last: The Onshape community is great. If you have a great idea for a Custom Feature but aren’t quite ready to write your own, head to the Onshape Forums and find a friendly Onshape ninja to help you. Onshapers love a challenge!
Enjoy!
Try Onshape Today
Head to our sign-up page to choose the right CAD plan for you and your team.
(Joshua Newth is a Part Studios Senior Software Engineer at Onshape.)
Latest Content
- Blog
- Becoming an Expert
- Assemblies
Built to Scale: Why Large Assemblies Don’t Slow Down in Onshape
07.16.2026 learn more- Blog
- News from Onshape @ PTC
- Artificial Intelligence
Onshape Labs: AI in CAD Guided by Designers, Driven by Innovation
07.15.2026 learn more- Blog
- Evaluating Onshape
- Data Management
- Collaboration
- Artificial Intelligence
How the Most Underrated CAD Feature Improves Design Workflows
07.09.2026 learn more