
05:57
I have a compulsion to create. Given that I can use Onshape from any web browser, I always have an outlet.
For me, as a software developer rather than a mechanical engineer, the spirit of model making, 3D design, and how that relates to software tools is what drives me. And “driven” is a pretty good adjective for the mindset I had as I worked on this project.
As you’ll see below, this project takes text, fonts, rendering, and refraction and puts it into a single scene that I entered into the Onshape 3D modeling competition. Since it was well-received, I decided to outline my design process.
https://www.onshape.com/en/blog/internal-design-contest-2023
3D Modeling the Glass (and Wowing the In-Laws)
A few years ago, I gave my father-in-law some titanium crystal rocks glasses. I love these glasses because they have all the light-bending sparkle of lead crystal but without the toxic lead. Plus, the design is a little more my style.
When I visited my in-laws, while they were out taking care of some business (I doubt they will ever retire), I made a CAD model of one of these rocks glasses – from their living room in Tennessee! It wasn’t much, but it was fun, and when they returned, I could illustrate to them how easy it is with Onshape to design and create anything – from anywhere!
I encourage you to do the same when visiting family – I’d bet money they’ll be stunned when you design and recreate something near and dear to them while they’re out for an afternoon.
Simple but elegant.
The original.
For a while, this glass sat on its own.
A Typeface Opportunity in Onshape
Unrelated to the glass, PTC Senior Software Engineer Ben Hetherington recently introduced new sketch text fonts in Onshape. I was excited about this as I’ve had a lifelong interest in fonts. While testing out the new fonts to build sketch profiles, I decided to go a bit further.
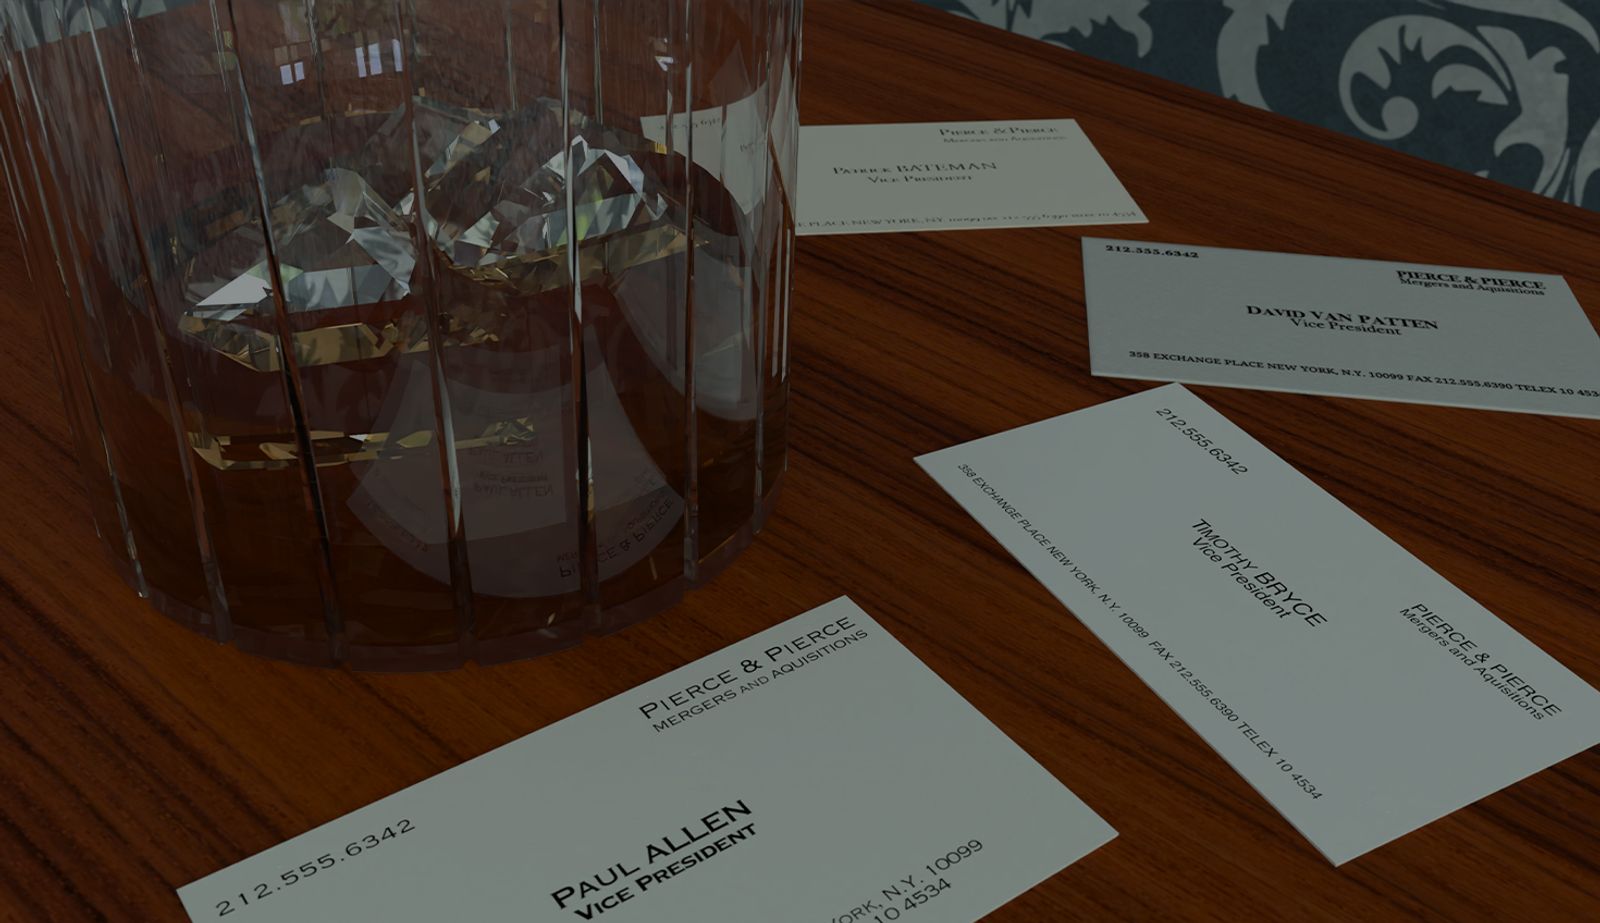
I started thinking of one of my favorite film scenes from "American Psycho". If you’re unfamiliar with the film, it is a little “severe,” to say the least. Still, there is a theme of taste, design, and an obsession with aesthetics in the story, all epitomized in a scene where a few businessmen in the ‘80s compare business card designs. This is when my Onshape mind lit up.
Assembling the Dream
I was compelled to recreate this business card scene, Onshape-style. Given my Tarantino-like obsession with authenticity, I knew I’d need to go big or go home. After getting a decent screenshot of each business card from the movie, I planned to redesign them in Onshape.
I learned when I made my chess set last year that something that could be a part or Part Studio is often better off as an assembly simply because the components can be managed more independently downstream. Consequently, I decided to:
- Model the text of each business card as a sketch.
- Create a small extrude cut into each card to simulate the pressed letter printing.
- Create a thin extrusion to model the letter ink.
- Create a composite part of all the ink extrude bodies.
- Mate each ink composite part into the cut indentations of the cards in separate assemblies.
- Mate each business card assembly to a table in another assembly.
The Typeface Challenge
The plan worked out pretty well. While Onshape supports several new fonts, there were a few obscure ones I needed to recreate differently.
Onshape can import DXF files into sketches. However, I don’t have a license for another CAD tool that supports DXF or the fonts I wanted. I could find the fonts I needed through various free font websites: Silian Rail (actually Garamond Classico SC), Copperplate, Pale Nimbus, and Romalian (actually Bodini), but I could only use them in Microsoft Office.
I then found the missing link: SVG.
It is possible to create some text in a downloaded font in PowerPoint and save that PowerPoint text as an SVG file. You can then use various free converters to convert SVG to DXF, and from there, Onshape can read DXF and render it as a sketch.
Getting the contours of a custom text rendering ready for export.
Imported DXF now in a Part Studio.
After setting up all the text in PowerPoint and creating the various intermediate data formats, I was able to get the text into Onshape and start laying out the text. I’ll admit I did use the image overlay feature in sketches to help align everything.
Here’s the result:
One shortcut I could take was to simply clone the Part Studio and swap out the sketch text for each card.
One side note – the misspellings and alignment issue are intentional, as they existed in the original film. I suspect that these mistakes were either:
- A simple oversight, or
- A nod to the idea of flaws hiding behind a thin veneer of perfection, one of the film’s themes.
A CAD Model’s Time to Shine
Around the time I finished this, I knew I had to get back into Render Studio.
To give some back story, when I was in college, I made this scene in NewTek’s LightWave 3D polygon modeler and ray-tracer.
This took weeks, maybe longer, not just of time modeling the scene but also hours and hours of rendering time. Thankfully, times changed, and I was able to make this model in Onshape and render it in less than an hour.
This is when I had to combine the rocks glass and the business cards together.
Bending Reality Using Onshape
As you probably know, crystal has a higher index of refraction of glass, which has a higher index of refraction than air. What this means is that light slows down in crystal, causing the light-bending characteristics you see in real life.
I started playing with this when I noticed that the “Patrick Bateman” card was distorted by the phone number. I tried a few different indices to exaggerate the reflection and distortion a bit. After all, the characters in the film all broke from reality a little bit as well.
I started with a few basic glass types included in Render Studio and went from there. Render Studio also offers paper materials, complete with various rough or smooth finishes you can customize, allowing you to take physically based rendering as far as you want.
The finished scene.
Through the looking glass.
Going Further with Render Studio
Render Studio now supports higher f-stops for depth-of-field simulation, namely f/32 and f/64. In the era of the three-lense iPhone, everyone loves depth-of-field and bokeh effects, but sometimes, especially in close-ups, f/4.6, f/8, and even f/22 give way too narrow of a field that’s in focus, making the settings not practical.
I tried a scene with f/32, giving me more but not infinite focus volume, and I also turned on the new Render Studio caustics sampling to see how the light shining through the glass would affect the items on the table. Here’s the result:
A Perfect CAD for Creativity
Looking at this entire film scene adventure, especially noting the PowerPoint text to Onshape workflow, you might ask, “Is this a bit indirect, obsessive, and even unnecessary?” Perhaps, but if you have very specific text (or any sort of unusual curve) needs in your model, this could help you achieve your goal.
If there is some obstacle I face in achieving a design, I’ll find a way, and if I can have fun doing it and pass on a few tips, so much the better. The Onshape Learning Center has more resources on modeling and rendering as well, but this is my take on a learning tutorial featuring fonts, texts, lighting, and some CAD creativity.
Try Onshape Today
Head to our sign-up page to choose the right CAD plan for you and your team.
Latest Content
- Blog
- Becoming an Expert
- Assemblies
Built to Scale: Why Large Assemblies Don’t Slow Down in Onshape
07.16.2026 learn more- Blog
- News from Onshape @ PTC
- Artificial Intelligence
Onshape Labs: AI in CAD Guided by Designers, Driven by Innovation
07.15.2026 learn more- Blog
- Evaluating Onshape
- Data Management
- Collaboration
- Artificial Intelligence
How the Most Underrated CAD Feature Improves Design Workflows
07.09.2026 learn more