
6:13
Like almost anyone who played The Legend of Zelda: Breath of the Wild, I long followed the updates and delays to the much-anticipated sequel Tears of the Kingdom. And during this time I wondered, “What will be the same or different? What will Link’s powers be? Will I still have to find roughly 1,000 Koroks?”
After many years, I finally received a pre-ordered copy in the mail and was equally excited and a little bit nervous. Excited to be completely immersed once again in the world of Hyrule and nervous about how long that immersion would keep me out of the real world!
But nonetheless, I dove in like Link taking his first leap with his paraglider, trusting it would all work out. And not long after starting I was struck with a thought: “Wait, this is just like Onshape!”
Onshape Assemblies in Zelda
Contains mild spoilers for “The Legend of Zelda: Tears of the Kingdom.”
If you’re new to Onshape, let me start by saying it is a professional-grade, cloud-native CAD platform that students and educators can access for free on any device, anywhere, anytime. But how does that relate to the new Zelda game?
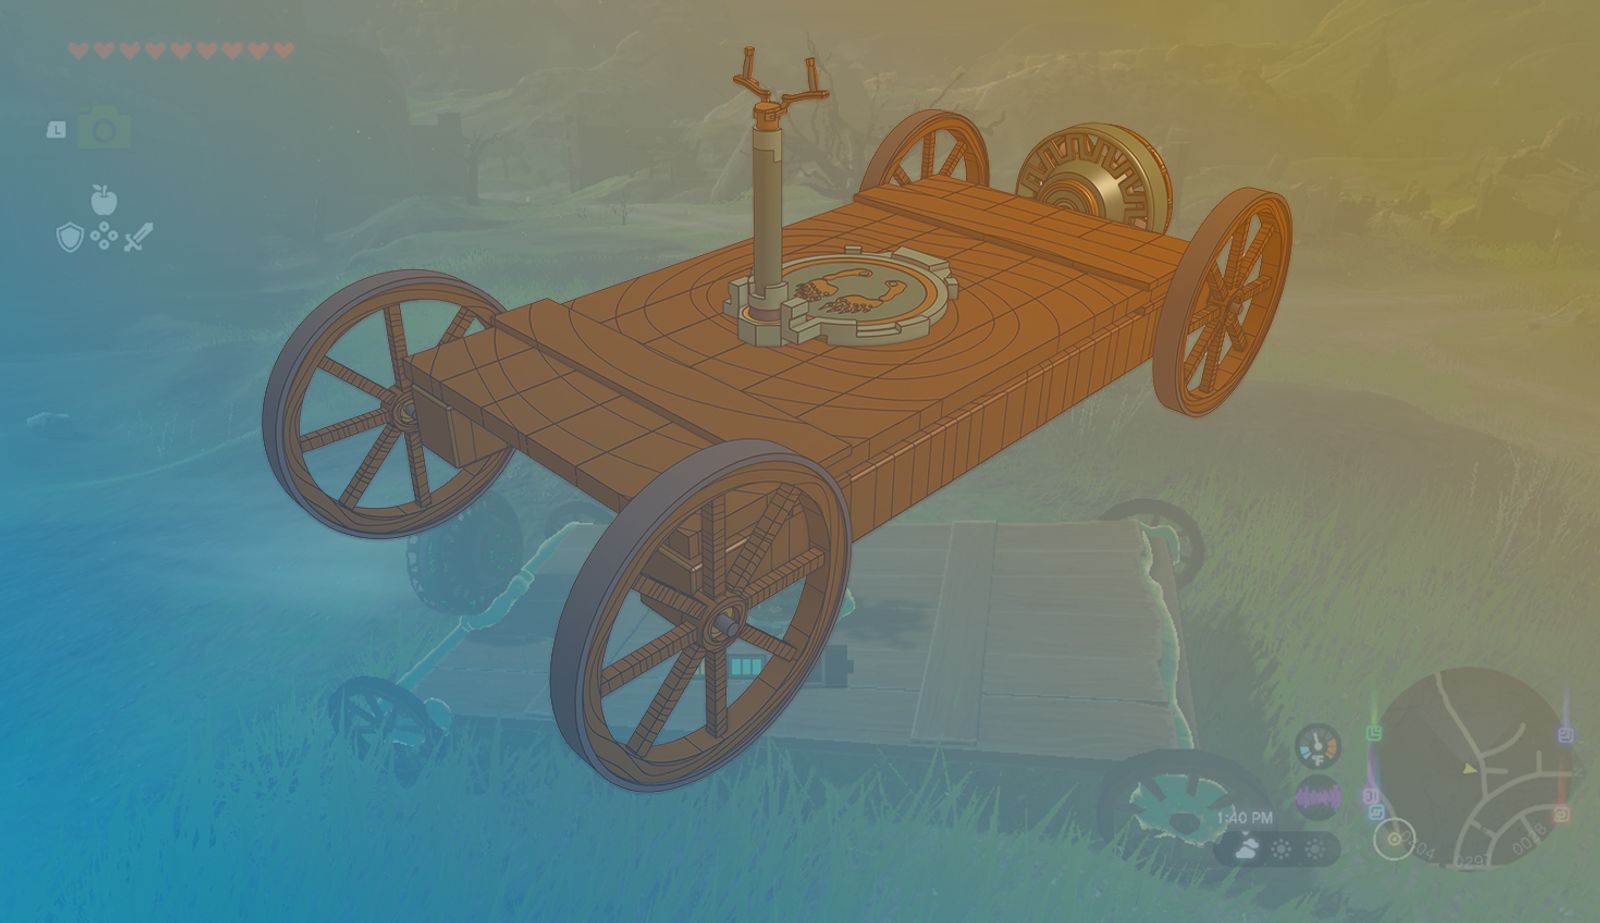
It won’t give away too much to say that in the game Link has a new power called Ultrahand, which allows him to lift objects, rotate/transform them in space, and attach them together to create vehicles and other helpful devices.
This process of transforming objects and attaching them is very similar to creating Assemblies in Onshape.
What stood out to me immediately in the game was the way that various connection points appear when you bring one object close to another. There are a set of predetermined connection points on each object that appear in common areas you would want to attach (i.e., corners, midpoints, faces, edges, etc.).
Compare that with what the Mate Connector page in the Onshape Help Center says: “With the Mate connector dialog open, moving the cursor over an entity 'wakes up' default inference points and the inference point closest to the cursor highlights as a Mate connector. As you continue to mouse over the entity, different default inference points appear.”
The method of assembling vehicles/devices in Tears of the Kingdom is almost identical to the method of creating Assemblies in Onshape! And once I made this connection, naturally, I decided to open up a new Document and try to recreate some Zelda objects in Onshape.
Learning Real Skills through Fantasy Designs
Now, I’m very much a beginner when it comes to CAD and using Onshape. I’ve taken a few courses on the Onshape Learning Center and even 3D printed some of my own designs, but nothing too complicated. Figuring out how to model some of the objects from the game in Onshape was a real challenge for me. But this challenge pushed me to become a much better designer!
Here are three tools I embraced during this process that might help CAD designers of a similar skill level:
Use (Project/Convert)
The “Use” sketch tool allows you to “project edges or faces of an existing part or sketch onto the active sketch plane.” It’s a tool I’ve had experience with, but I didn’t fully understand how valuable it was until this process.
Designing a part with relatively complex geometry usually means you’ll need more than one sketch. With the “Use” tool, you not only get access to related geometry that you’ve already defined, but you link your new sketch to this existing geometry. This means if you go back and change something in that original geometry, your new sketch will adjust accordingly.
I used this tool a lot when designing the different layers of the Zonai Fan!
Plane
When designing the Steering Stick, I faced a real challenge when designing the handlebars. I must have attempted four or five different methods to recreate the design I was seeing in the game. But all of these attempts relied heavily on construction planes.
The “Plane” tool is important for creating sketches where you need them. The ability to create a plane that was offset from a part’s face or at an angle to that face allowed me to create the more intricate details at the top of the steering column, as well as to loft various sketch faces together to create the steering bars.
Thicken
I had no idea what the “Thicken” feature tool was when I began this project, but it ended up being crucial to my design!
With the Zonai Fan, I was working on the curved front face of the fan that needed sections cut out of it for the air to flow through. These cutouts would then need fillets to give them nice round edges. But I couldn’t figure out why my fillets weren’t working.
I was extruding/removing my cutouts through the rounded face, and they looked correct, but I kept getting errors when I tried to apply fillets with the same dimension as the depth of the material. Looking closer, I realized that since I was working with a curved face, the way I was cutting out the sections straight-on was causing some areas of the face to be deeper than others.
The solution: Extrude the cutout sketch up to the curved face and then Thicken/Remove that resulting face through the original curved face.
This gave me cutouts with a consistent depth/angle through the curved face and allowed me to apply the fillets as I wanted them!
Inspired Design & Project-Based Learning with CAD
Aside from the design skills I gained from tackling this project, I learned an important lesson about project-based learning.
There was no practical need for me to open up Onshape and design fantasy objects from a Zelda video game. But I was excited about the connection I saw between the game and Onshape, and I thought it would be fun. Through this motivation, I ended up learning a number of valuable skills that I could apply to real-world projects going forward.
Particularly for students, this takeaway is important. You could certainly spend all of your time in Onshape designing valves, engines, and other components that are important to the world of engineering. And maybe you are motivated and inspired by designing these components!
But for me (and I’m sure many other beginner designers), the projects that I’m going to be most inspired to push through and do well are the ones that are the most fun.
Furthermore, the fun of it allowed me to be less intimidated by the prospect of designing these objects. I’m sure if I thought about it too much, I would have eventually concluded that they were too challenging for me to attempt. But my interest in the subject allowed me to look past that and be more successful than I would have predicted.
For me, it was Zelda, but maybe you’re more into Batman or chess? Whatever you are passionate about or inspired by, see if there’s a way you can bring that into Onshape and I’m sure your CAD skills will grow.
Lastly, I just want to note that if you are also a Zelda fan like me, I made the Onshape Document public. Explore it to see some more Zelda designs I didn’t mention, such as my vehicle assembly that uses a Wood Grain FeatureScript and some Korok puzzles.
Let’s see if as a community we can create all the Zonai devices in the game!
Get Started with Onshape Education
Onshape for Education brings CAD out of the computer lab and into the modern era.
Latest Content
- Case Study
- Robotics
How Fauna Robotics Is Leading Humanoid Robot Development with Cloud-Native CAD & PDM
03.30.2026 learn more- Blog
- Evaluating Onshape
- Electronics
- Integrations
- PCB Studio
How Onshape PCB Studio Pulls 3D Component Models Straight from Altium 365
05.21.2026 learn more- Blog
- Evaluating Onshape
- Collaboration
- Data Management
What’s the Difference Between File-Based and Cloud CAD?
05.20.2026 learn more- Blog
- Customers & Case Studies
- Arena PLM Connection
The Cloud-Native Workflow Behind Coco’s Next-Gen Delivery Robot
05.14.2026 learn more