
3:03
When a CAD model is almost ready for production, Onshape offers a set of Release Management features that make reviewing before manufacturing easier and more efficient.
Today's Tech Tip will show you tips and tricks you can use when reviewing a Release Candidate in Onshape.
How to Access a Release Candidate
If you have an Onshape Professional or Enterprise account, there are multiple ways to view a Release Candidate.
By using the link in the Onshape notification:
By using the link in the email:
Or, by clicking the Versions and History icon, selecting “Release” from the context menu, and then finally highlighting the name of the release:
A Release Candidate that is submitted for review and approval is marked as “Pending” in the Versions and History flyout's context sub-menu. The state of any unreleased objects in the Release Candidate will also be “Pending”.
Whatever option you choose, you will be presented with the same Release Candidate dialog. Here is an example below.
Reviewing Release Candidates
During the release workflow of a Release Candidate, it’s crucial to conduct a thorough review that involves several steps.
First, verify that all the information presented in the dialog is accurate. Second, check the "Revision label" to ensure that the appropriate version of the object is listed while keeping in mind that it's not possible to use skipped revision labels.
Furthermore, it’s essential to review the model, drawing, or other object type by clicking on its name, which is a link that opens the relevant Onshape tab in another browser tab. Use the properties icon to access the properties view for the object and make any necessary changes.
Finally, it's important to utilize the appropriate button to either Approve (Release) or Reject an entire release. Approving the release marks the objects as released. Rejecting it updates the status of the Release Candidate to "Rejected." Additionally, discarding the Revision removes the release and reverts it back to a normal Onshape version, which is only an option available to the creator of the Release Candidate.
Using the 2D Comparison Tool
You may already be familiar with Onshape's 3D comparison tool, which allows you to compare versions, micro-versions, or releases across one or multiple branches. However, you may not be aware that Onshape also offers a 2D comparison tool.
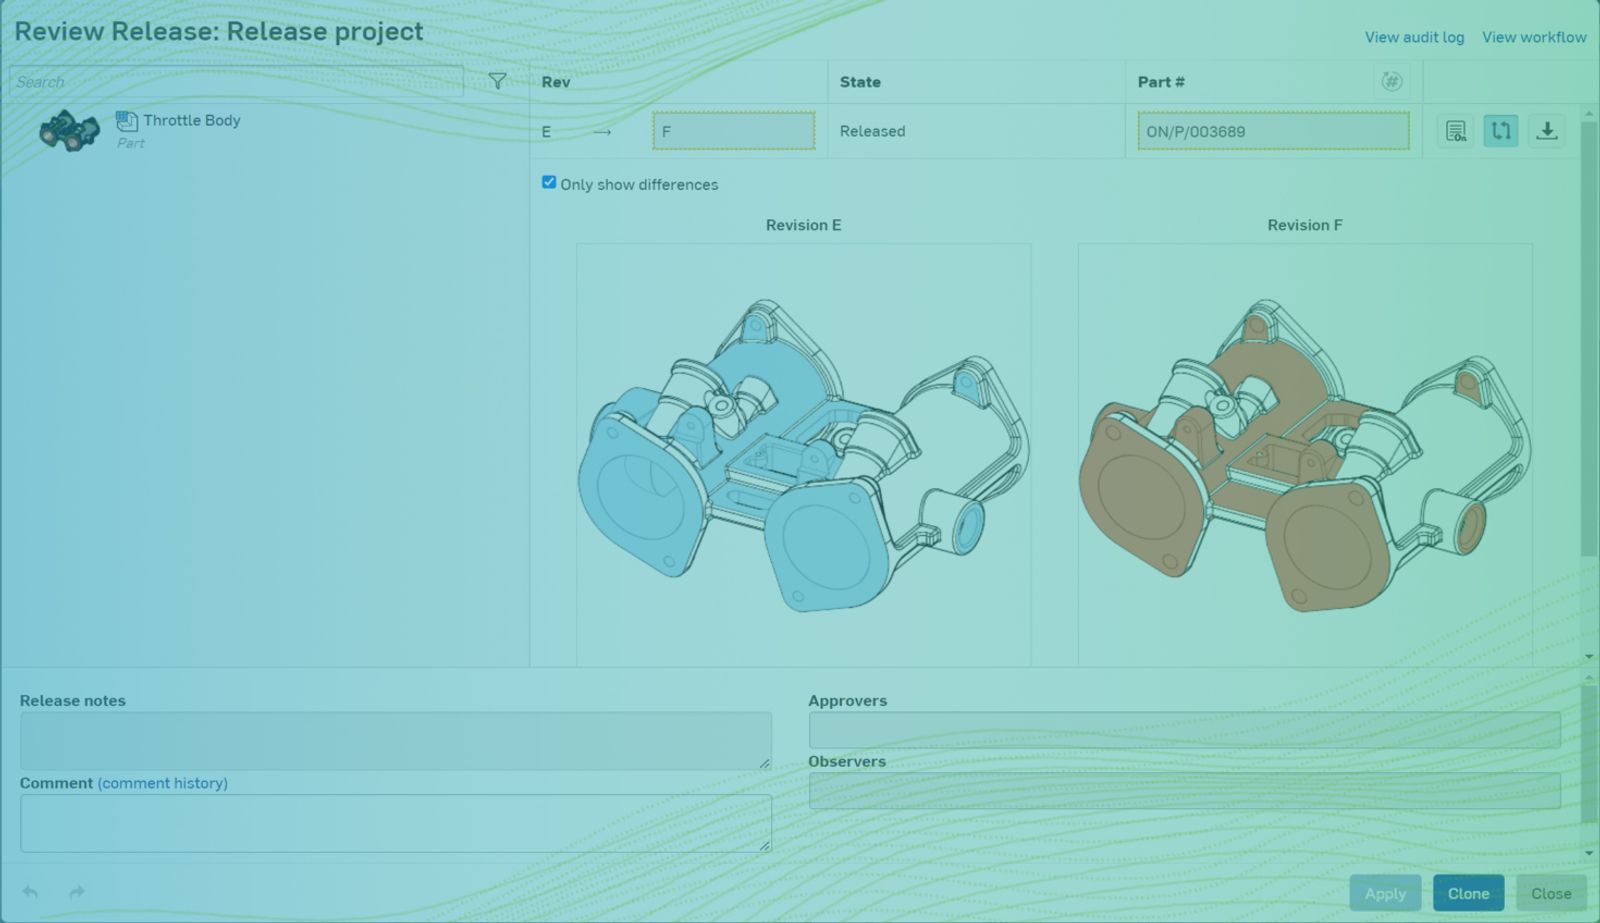
There is only one prerequisite to use this tool: You need to open a Release Candidate that has more than one revision. In such a case, a compare button will appear on the dialog's right side.
However, you can only compare with the previous revision. For instance, if I review Release F, I can only compare it with revision E, as shown in the example below.
To quickly understand the differences between the two parts, you can activate the option “Only show differences” so that colors will appear on the model to highlight the differences.
This Tech Tip helped you learn how to better access and review your Release Candidates. For more on Release Management, check out these related Tech Tips:
- The Top 3 Advantages of Onshape's Release Management
- Tech Tip: Delegating Approvals
- Tech Tip: Part Revision in Release Management
- Tech Tip: Allowing Third Parties to Participate in Release Management
- Tech Tip: How to See Your Part Revisions in Onshape’s Release Management
- Tech Tip: How to Improve Onshape’s Release Management with Default Values
- Tech Tip: How to Use Onshape’s Release Management Change Detection
- Tech Tip: Quickly Link to the Last Revision Using Onshape’s Change Detection
- Tech Tip: Obsoleting Revisions with Onshape Release Management
- Tech Tip: Using Release Management with Onshape Mobile
Interested in learning more about using Onshape? You can review the most recent technical blogs here.
Latest Content
- Blog
- Becoming an Expert
- Assemblies
Built to Scale: Why Large Assemblies Don’t Slow Down in Onshape
07.16.2026 learn more- Blog
- News from Onshape @ PTC
- Artificial Intelligence
Onshape Labs: AI in CAD Guided by Designers, Driven by Innovation
07.15.2026 learn more- Blog
- Evaluating Onshape
- Data Management
- Collaboration
- Artificial Intelligence
How the Most Underrated CAD Feature Improves Design Workflows
07.09.2026 learn more