
2:13
Onshape Enterprise customers can use the Onshape-Arena Connection to simplify data transfer to Arena PLM. Syncing data to Arena requires assigning categories and part numbers to part instances and subassemblies. You can populate these fields individually during the design process, but applying bulk changes using the Onshape Bill of Materials (BOM) table is a convenient time-saver.
This Tech Tip explains how to quickly and easily assign categories and part numbers to assembly part instances and subassemblies using the BOM table.
For Arena PLM functionality, your company Administrator must configure your Onshape Enterprise per the Onshape-Arena Connection Admin Guide.
Onshape Professional customers can use this technique to assign part numbers and categories without syncing them to Arena PLM.
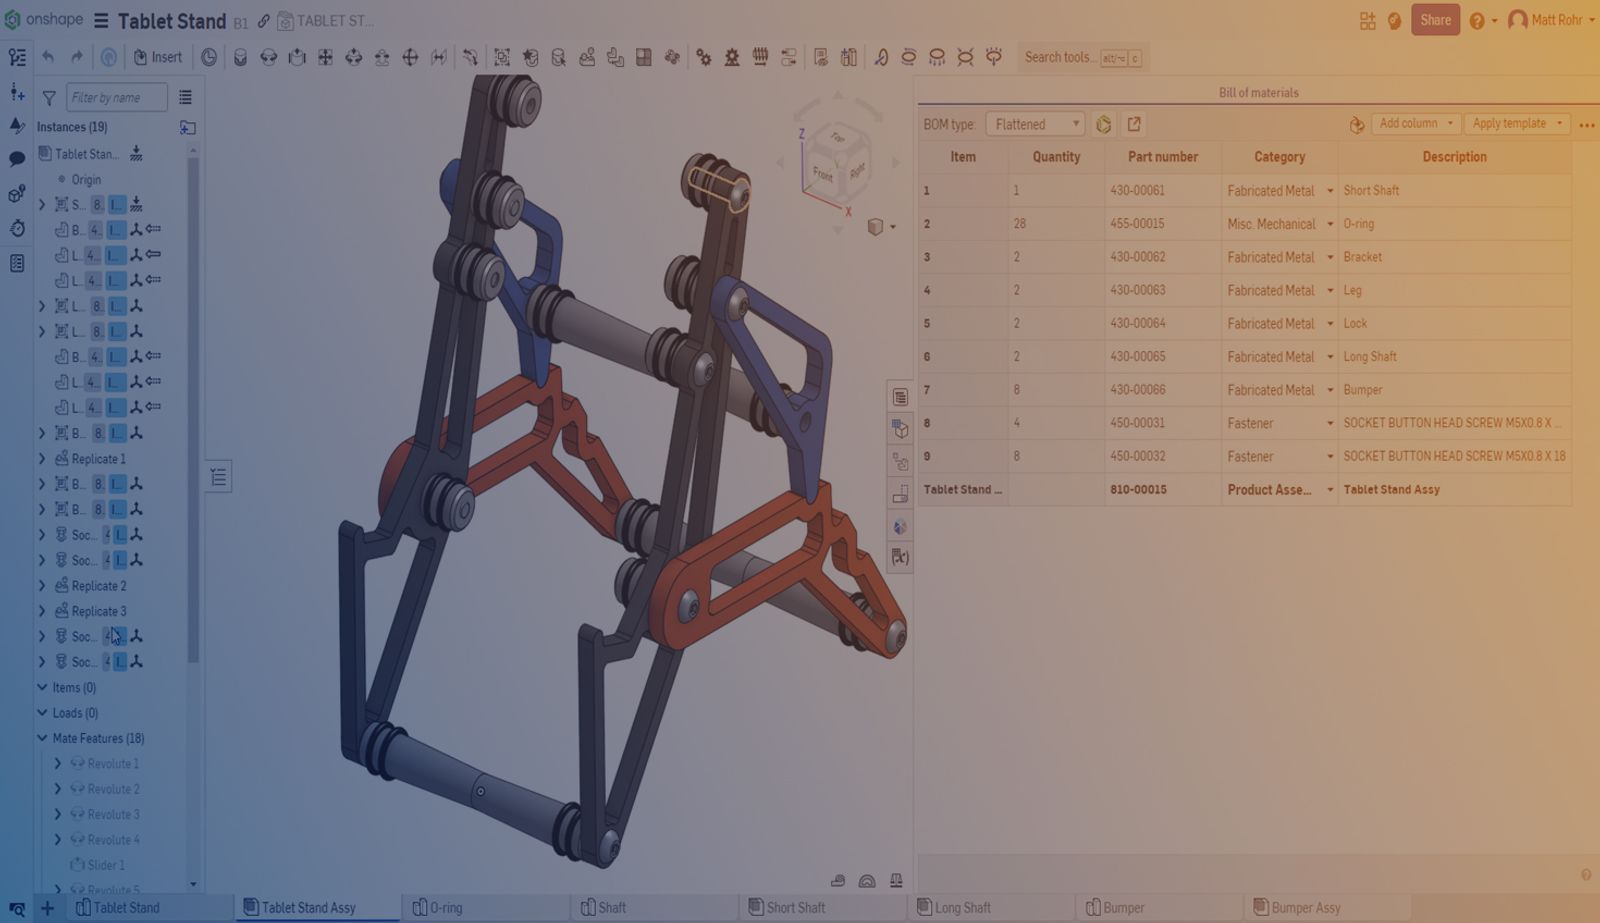
Configure the BOM Table
In an assembly, you can show the BOM table by clicking the BOM table button () on the right edge of the graphics area. Part number is a default column in this table. Click the Add column dropdown at the top of the BOM table to display additional part instance properties, such as Category, Material, and Finish. Clicking the Overflow menu () at the top right and selecting Show top-level assembly row is also helpful for assigning a category to the active assembly.
Assign Categories
In the Category row, click the cell dropdown arrow to assign categories to each item.
Generate Part Numbers
Right-click an empty cell in the Part number column and select Generate next part number. This step reserves an Arena part number without creating an Arena item. You will create the Arena items when syncing the BOM table.
Assign Custom Properties
Use the BOM table to assign additional custom properties if required.
To view the Structured BOM, click the BOM type dropdown at the top of the BOM table and switch from Flattened to Structured view. Assign categories, part numbers, and other properties to subassemblies as required.
Sync the BOM with Arena PLM
At the top of the BOM table, click the Sync BOM to Arena button () to sync with Arena PLM.
If this is the first time syncing the BOM, the Onshape-Arena Connection ripples through the entire BOM structure and creates new items. Subsequent syncs only act on the current level of the BOM, which prevents interfering with colleagues working on subassemblies.
Using the Onshape BOM is an efficient way to assign categories, part numbers, and custom properties. This workflow expedites data syncing with Arena PLM but is a helpful technique for anyone managing BOM data.
Watch the video below to see these strategies in action:
Möchten Sie mehr technische Tipps von Onshape erfahren? Die neuesten technischen Blogs finden Sie hier.
Das Onshape Discovery-Programm
Erfahren Sie, wie qualifizierte CAD-Experten Onshape Professional bis zu 6 Monate lang nutzen können — kostenlos!
Neuester Inhalt
- Blog
- Experte werden
- Baugruppen
Built to Scale: Why Large Assemblies Don’t Slow Down in Onshape
07.16.2026 Mehr Infos- Blog
- News from Onshape @ PTC
- Artificial Intelligence
Onshape Labs: AI in CAD Guided by Designers, Driven by Innovation
07.15.2026 Mehr Infos- Blog
- Evaluating Onshape
- Datenverwaltung
- Zusammenarbeit
- Artificial Intelligence
How the Most Underrated CAD Feature Improves Design Workflows
07.09.2026 Mehr Infos