
3:29
Shells are a powerful feature, often employed in the creation of thin-walled parts. But with great power comes great responsi— I mean, a higher probability of failure. This Tech Tip will address common failures, explain why they happen, and recommend how to fix them.
Failure 1: Curvature
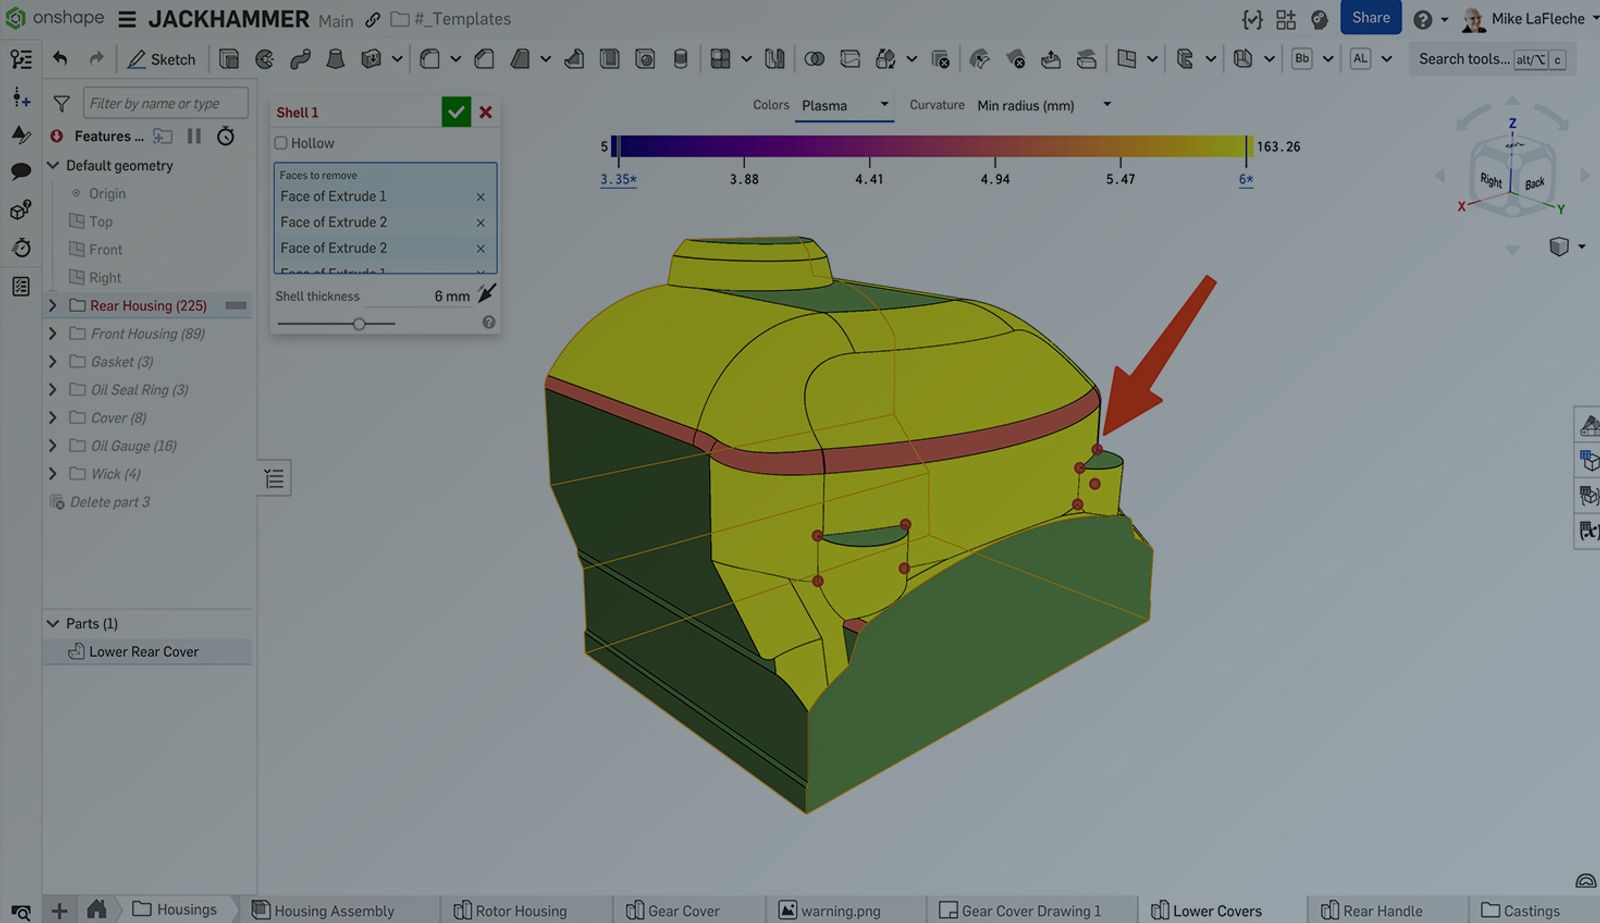
Small radii or sharp corners can prevent a successful shell. If the shell thickness is larger than a feature’s curvature radius, the offset surface cannot form without intersecting. Here is the best way to visualize this:
Onshape curvature color map overlaid on the model, showing a radius of 5mm in light blue.
To mitigate this, check the model’s minimum curvature radius and ensure it is at least as large as your shell thickness. Check this using a curvature color map with the graph set to the minimum radius. If it is too small, consider enlarging tight corners or reducing the shell thickness. In addition, adding fillets after shelling (not before) can also avoid creating tiny radii that block the shell operation.
Failure 2: Self-Intersecting Geometry
If shelling causes internal faces to overlap, the feature fails. This often happens in concave areas or thin regions where the inner shell surface might offset into the outer surface. To troubleshoot, inspect the model for such problematic areas. Onshape highlights where the shell fails, as shown below:
Onshape offers detailed graphic highlights when a shell feature fails, in this case as a red vertex highlighted in areas of concern.
Another good troubleshooting method is to use an Offset surface feature to inspect areas of the model manually. If an offset of the face at the desired thickness fails or creates self-intersections, the shell also fails. This can be resolved by adjusting that area’s design (thicken or reshape the region) or shelling in multiple steps (shell a simpler shape first, then cut openings, etc.).
Offset surfaces reveal any error conditions before performing a full shell operation. In this case, all looks good.
Failure 3: Thin Wall Constraints
Very thin features can cause shell failures because there is not enough material to maintain the specified wall thickness. For example, if two opposing walls are closer than twice the shell thickness, the interior surfaces collide. The result is an error like “Shell did not regenerate properly; could not shell part with selections.”
The solution is to increase those feature thicknesses or omit them during shelling. Model such delicate features after performing the shell (for example, add ribs, bosses, or small details once the part is hollow). Alternatively, use a smaller shell thickness that the thin areas can accommodate, or redesign the spacing so the shell fits.
Once successful, validate the correct geometry is obtained with Onshape’s built-in Thickness analysis tool.
Onshape’s powerful Thickness analysis tool helps validate the design to ensure the part’s wall thickness meets design and manufacturing specifications.
Notable Mention: Feature Complexity
Highly detailed or intricate geometry can cause issues related to the above three failures. Many tiny faces, deep pockets, and/or complex patterned features can make the feature slower than it needs to be. These are operations that can drag down performance with Onshape’s built-in Show regeneration times button at the top of the Features list (it looks like a stopwatch).
To avoid slowdowns and errors, simplify the model where possible and introduce those features after shelling. If the solutions presented above are too hard to implement, consider these alternatives to the shell feature:
- Hollow manually. One method is to offset or copy the exterior faces inward by the desired thickness and use a Boolean feature with the Subtract operation type to remove the interior.
- Consider using surfaces and the Thicken feature.
Onshape presents an interactive Regeneration times list that can pinpoint problem areas in feature performance.
By systematically checking for the issues above and adjusting your design, you can troubleshoot most shell failures. Use the evaluation tools to pinpoint problem areas, and modify the model or approach as needed. With some iterations, even the most challenging geometry can be successfully shelled.
For more in-depth tutorials, troubleshooting guides, and best practices on Onshape features, visit the Onshape Learning Center. There you'll find comprehensive resources to further develop your CAD skills and optimize your design workflow.
The Onshape Learning Center
Take self-paced courses, read articles, or sign up for an instructor-led training session.
Latest Content
- Blog
- Becoming an Expert
- Assemblies
Built to Scale: Why Large Assemblies Don’t Slow Down in Onshape
07.16.2026 learn more- Blog
- News from Onshape @ PTC
- Artificial Intelligence
Onshape Labs: AI in CAD Guided by Designers, Driven by Innovation
07.15.2026 learn more- Blog
- Evaluating Onshape
- Data Management
- Collaboration
- Artificial Intelligence
How the Most Underrated CAD Feature Improves Design Workflows
07.09.2026 learn more