
3:24
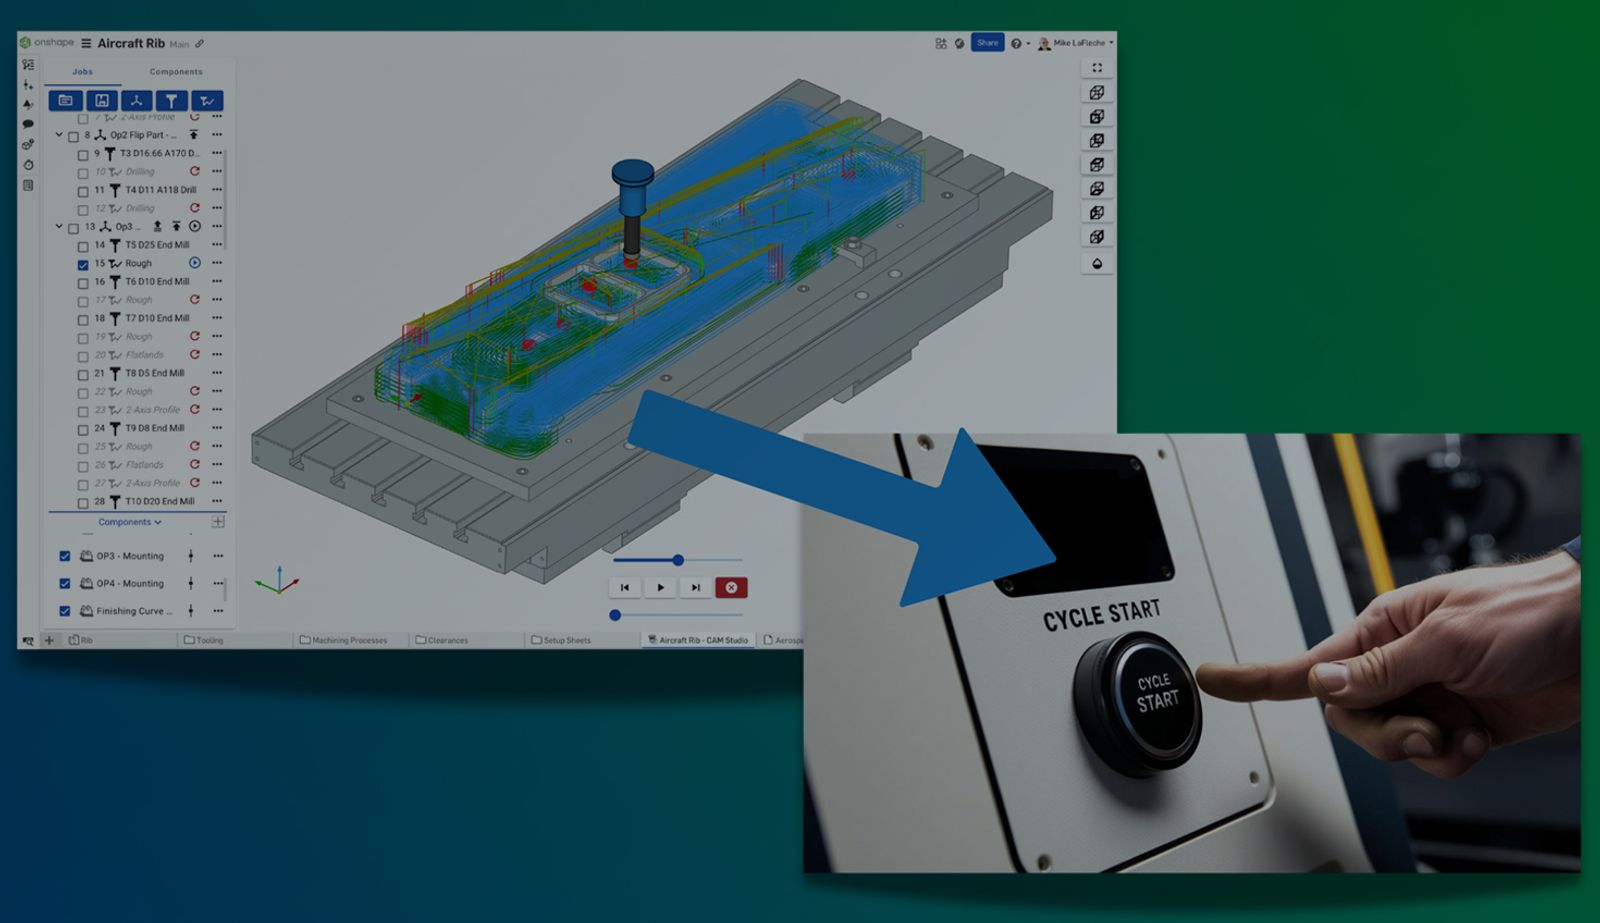
Before you press the cycle start button, it is essential to understand exactly how your tool will behave on your CNC machine. Onshape CAM Studio offers three levels of simulation, each designed to help catch errors early and build confidence in your machining setup, without wasting material or risking machine damage.
This Tech Tip explains the purpose of each simulation level and how to use them in sequence to ensure the safest and most efficient machining process possible.
1. Backplot: Fast Toolpath Review
Backplot is the most basic simulation mode in Onshape CAM Studio. It shows a simple animated view of the toolpath relative to your finished part.
Use Backplot to:
- Check approach paths and retraction moves
- Confirm tool entry and exit points
- Verify depth of cut and tool clearance
Backplot is ideal for a first-pass verification, but it does not show material removal or interaction with stock. Use it as a quick way to ensure your toolpath behaves as expected.
2. Verify: Visualize Stock Removal
Verify simulation adds a second layer of depth by simulating stock removal as your toolpath progresses through the material.
Use Verify to:
- See how the tool engages with the raw stock
- Track depth of cut and number of passes
- Detect gouges or unintentional overcuts
- Check for possible tool holder interference with the part
This level of simulation is useful when you want to analyze the engagement between the tool and material, or confirm that the toolpaths remove material efficiently and accurately.
3. Machine Simulation: Full Collision Detection for Real-World Safety
Machine simulation provides the most comprehensive simulation environment in Onshape CAM Studio. It includes a full machine kinematic model, simulating the CNC machine’s exact movements with real-world geometry and motion constraints.
Detects Collisions with the Spindle and Housing
Machine simulation takes into account the full geometry of the tool, holder, spindle, and machine enclosure. It detects collisions not only between the tool and stock but also between machine components, such as the spindle body and the part or fixtures.
This is especially important in deep cuts or angled tool entries, where the spindle might get closer to the part than expected. Avoiding these collisions protects the machine’s most expensive and sensitive components.
Verify Clearance Around Fixtures and Workholding
Machine simulation includes the actual positioning and dimensions of vises, clamps, or custom fixtures. It ensures that the toolpath does not crash into anything that holds the part in place, which is a frequent source of mid-job failures.
This helps avoid damage to not only the part but also the workholding hardware and machine structure, reducing the risk of misalignment and downtime. If there is a collision, the simulation stops, and the affected faces are colored red.
Confirm Safe Movement Across All Machine Axes
This simulation type runs the full job as it would on the machine, including rapid moves, tool changes, and multi-axis transitions (if applicable). It confirms that the machine will not exceed its travel limits or attempt unsafe moves.
Running this kind of simulation protects against overtravel alarms, servo faults, and operator frustration, ensuring your programs are fully compatible with your actual hardware.
Run It All in the Cloud
Because Machine simulation is cloud-based, high-end hardware running complex simulations is not necessary. You can simulate large parts, complex assemblies, or tight-tolerance jobs from anywhere, even on low-powered devices.
This makes it ideal for team-based workflows, design reviews, and remote production approvals, all without installing a single piece of software.
Recommendation: Use All Three, Progressively
Each simulation level serves a specific role. Use them together for the best results:
- Start with Backplot for a quick visual pass and sanity check
- Move to Verify to evaluate how the tool interacts with the stock
- Finish with Machine Simulation to catch any real-world collision or motion issues before running the job
This layered approach gives you the confidence to run complex jobs efficiently and safely, all from within Onshape’s integrated CAD/CAM/PDM environment.
Ready to explore machine simulation workflows in more detail? Take the self-paced Onshape CAM Studio Learning Center course and build confidence in every cut.
The Onshape Learning Center
Take self-paced courses, read articles, or sign up for an instructor-led training session.
Latest Content
- Blog
- Becoming an Expert
- Assemblies
Built to Scale: Why Large Assemblies Don’t Slow Down in Onshape
07.16.2026 learn more- Blog
- News from Onshape @ PTC
- Artificial Intelligence
Onshape Labs: AI in CAD Guided by Designers, Driven by Innovation
07.15.2026 learn more- Blog
- Evaluating Onshape
- Data Management
- Collaboration
- Artificial Intelligence
How the Most Underrated CAD Feature Improves Design Workflows
07.09.2026 learn more