
04:05
Configurations are one of the areas where Onshape excels the most. They’re built-in, can be changed by viewers and editors alike, don’t bloat file sizes like when working with a configured file in an installed system, and can be released individually rather than all at once.
The mutually exclusive nature of Onshape’s configurations means you can have a variety of configuration inputs, expanding your design variants exponentially with minimal effort. Because of this, it’s important to make sure only valid configurations can be created for your parts and assemblies.
This is where visibility conditions come into play.
Part Visibility Conditions
Visibility conditions are valid at both the part and assembly levels, and their impact can be immediately noticed. See the example below where no visibility conditions are set. The model is fully functional, but the Configuration panel contains all 9 configuration inputs for this particular Part Studio.
In this case, changing the Length input does not make any difference when the Size configuration isn’t set to custom, nor would changing the configurations for the cutouts if the “Add cutouts” configuration was toggled off. These configurations aren’t broken, but they aren’t applicable to this given model state. This is where visibility conditions shine.
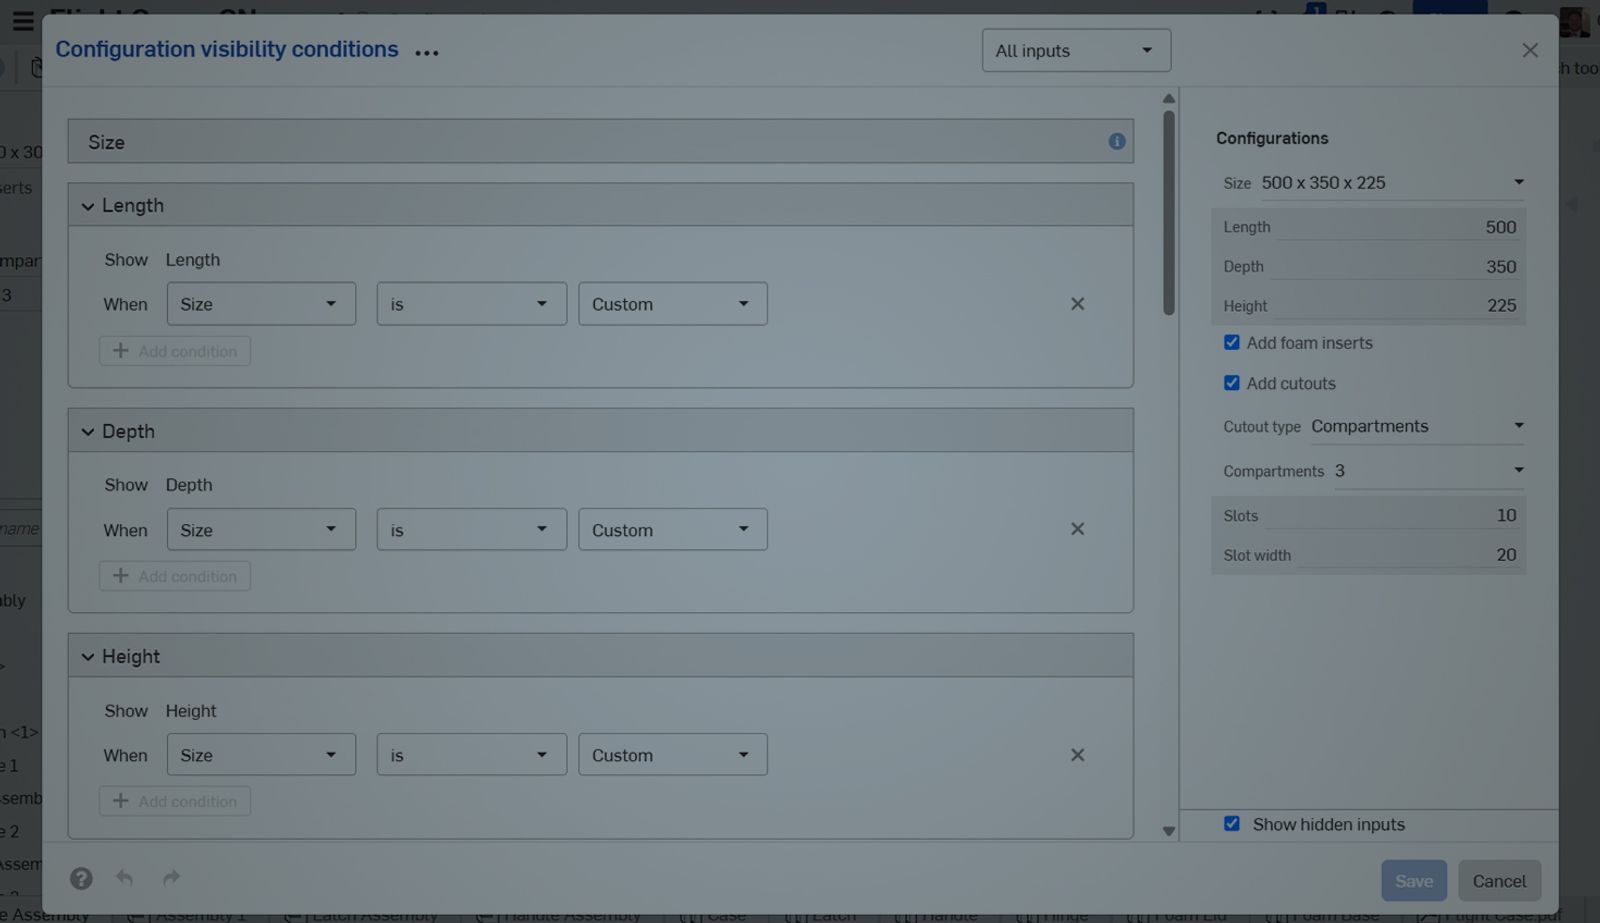
The Configuration visibility conditions dialog lets you define the logic for what configuration options are shown and in which cases they’re applicable. This is particularly helpful when implementing larger or more complex configuration possibilities, as it both cleans up the UI for the user (and viewers) and ensures that only realistic, possible configuration combinations are selectable.
The easiest way to access these Configuration visibility conditions is through the icon on the Configurations panel on the left side of your workspace, shown below.
There are two components to the Configuration visibility conditions dialog: the configuration drop-downs and the Configuration panel preview. For each configuration input you create, you can select whether it is always visible or only visible when a condition(s) is met for list or checkbox inputs.
The preview panel on the right lets you see how your visibility conditions are stacking up, with hidden inputs shown in grey when the “show hidden inputs” option is selected. This allows for immediate feedback on the logic you have configured to see how certain choices may impact one another.
With list inputs, you have even more control over visibility conditions using the “+” icon to add option rules, which can further help show/hide specific variables within a given configuration input. This is helpful in situations where you might have a large number of options in a “list” variable, but only some of them are applicable based on your previous configuration selections.
In this example, we’ve temporarily restricted the number of compartments to 1 or 2 when the size selection is in between a smaller range, and to 3 or 4 when the size selection is in between a larger range, while also allowing all 4 options to be selectable when the size is custom.
Note that if you want to add more logic to your variable configurations, use ternary operators as described in this previous Tech Tip on using expressions in numeric fields.
Implementation in Assemblies
An important aspect of Onshape configurations is how they are respected at the assembly level. When visibility conditions are defined at the Part Studio level, those conditions follow the part(s) to assemblies, allowing you to quickly and easily insert the desired configurations of your part(s). This same concept holds for subassemblies: any visibility condition you create in an assembly, following the same process as for parts, will carry over to a top-level assembly.
All of the concepts discussed above also apply to assembly-level configurations, where their power can be fully realized and can be used in much the same way to create realistic, modular assemblies that both editors and viewers can fully control.
Remember, visibility conditions will need to be established again at higher-level assemblies. However, if your part or subassembly conditions are set up properly, it will ensure that you cannot accidentally insert a configuration of a sub-component that would not be valid at the source level, as shown in the example below, where we try to put 3 compartments on one of the smaller size configurations.
From part to subassembly to top-level, Configuration visibility conditions in Onshape have you covered every step of the way!
This Tech Tip helped you learn about some ways to utilize Configuration visibility conditions to level up your configured design process.
Find more resources regarding initial configuration setup available in the Learning Center, as well as information on sharing your documents (and by association, your configurations) with other users!
Friends Don’t Let Friends Use Old CAD!
Know a colleague who could benefit from our cloud-native, fully-featured collaborative design platform?
Latest Content
- Blog
- Evaluating Onshape
- Electronics
- Integrations
- PCB Studio
How Onshape PCB Studio Pulls 3D Component Models Straight from Altium 365
05.21.2026 learn more- Blog
- Evaluating Onshape
- Collaboration
- Data Management
What’s the Difference Between File-Based and Cloud CAD?
05.20.2026 learn more- Blog
- Customers & Case Studies
- Arena PLM Connection
The Cloud-Native Workflow Behind Coco’s Next-Gen Delivery Robot
05.14.2026 learn more